Messier 36 – Open Cluster in Auriga

Image

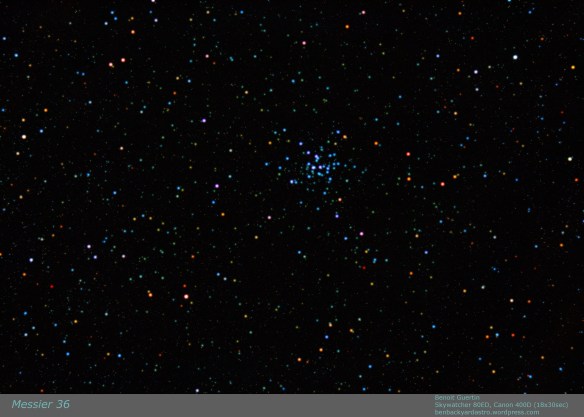
Open Cluster Messier 36 (NGC 1960) is located in the Auriga constellation.  Located about 4,100 light years from Earth, and 14 light years across, it has at least 60 members.  It is very similar to the Pleiades (M45) and if M36 was at the same distance (M45 is 10 times closer) it would be of similar magnitude.  Two other open clusters from Messier’s catalog are located nearby: M37 and M38.  The stars in the cluster are of spectral type B2, and fairly young: 25 million years.

Open Cluster Messier 36. Skywatcher 80ED, Canon 400D 18x30sec

Open Cluster Messier 36. Skywatcher 80ED, Canon 400D 18x30sec

The blue-ish stars contrast with the older yellow and orange stars in the background.  This can be further enhanced by using the SBLUR function in IRIS to selectively blur and enhance the colors of bright stars.  While the colors are exaggerated in the image below, it is nevertheless interesting to see the vast diversity of stars and their color.

Open Cluster Messier 36. Skywatcher 80ED, Canon 400D 18x30sec

Open Cluster Messier 36. Skywatcher 80ED, Canon 400D 18x30sec (SBLUR for colour)

Telescope: Skywatcher 80ED
Camera: Canon Digital Rebel XTi (400D)
Exposure: 18 x 30sec (ISO 800)
Date: 18Mar2016

Composition with Landscape

I’ve mentioned it before that you don’t need a fancy telescope and tracking equatorial mount to get into astrophotography.  Simply a camera on a tripod with a short focal lens can do wonders, especially with the high ISO settings in new cameras. A single 10 seconds exposition can reveal lots of stars, however to capture more photons a longer exposure is not better as the stars will become streaks.  But one can easily improve the image and get better signal/noise ratio by stacking multiple images.

However, there is one drawback to stacking multiple exposures if you decide to also capture the landscape: Earth rotates, therefore the sky moves while the landscape stays still.  If you align the images using the stars, then the landscape becomes a blur.  Not the end result that we want.  Luckily a quick composition with two layers and a mask solves everything.

Below is a single 10 seconds exposure at ISO 800 with a 17mm F4 lens; you have the landscape with city lights and the stars above.  Yes that is Orion…

Single 10sec exposure (ISO 800)

Single 10sec exposure (ISO 800)

In order to improve my signal, I worked with IRIS to align and stack 5 frames, this reveals many more stars, but also amplified the light pollution.

Aligning and stacking 5 images. More stars appear.

Aligning and stacking 5 images. More stars appear.

Luckily within IRIS there is a function to remove sky gradient.  The algorithm takes a series of sample points and attempts to make the sky uniform.  Not bad, the images are not a hopeless case.

Removing the sky gradient with IRIS

Removing the sky gradient with IRIS

As mentioned above, the alignment was performed with the stars, hence the background is now blurring.  Below is a close-up.

But when aligning on stars, the landscape blurs.

But when aligning on stars, the landscape blurs.

That is just 5 images, stack a much larger quantity or with more time between frames and it will only get worse.  It becomes pointless to shoot with the landscape if the end result is blurry.  Luckily working with layers in a photo editor can easily solve the issue.  We want to keep the stars from the stacked image, but the landscape from a single frame.  Follow these easy steps:

  1. Load into your base layer one of you single frames.  This is what will be used for the landscape.
  2. Load into a new layer your stacked image.  As your stacked image contains more and brighter stars select to Lighten Only instead of normally adding both layers.  You can play with the brightness of the stacked layer, and/or darken the base layer to get the desired blending.
  3. Create a mask to the stacked layer such that the blurred landscape is not permitted to show through.  See image below, I simply grabbed the airbrush and blackened the landscape area in the mask such that it will not show through the layer.  Note that the I only edited the mask, not the image itself.
Creating a mask for my layer: white is transparent, black will block

Creating a mask for my layer: white is transparent, black will block

The end result, is improved image of the sky, and a landscape that is still sharp.

Both layers added with the mask

Both layers added with the mask

Below is a comparison the composition with stack and layer (left) and a single shot (right).  We are able to achieve both of our goals of getting more stars (more signal) while keeping the landscape from becoming a blur.

Comparing the composition with layers (left) and single shot (right)

Comparing the composition with layers (left) and single shot (right)

And why not take some time to identify some key features in the image.

Constellations Orion and Taurus above the landscape.

Constellations Orion and Taurus above the landscape. (Click to open)

Tripod and a Camera? Make a TimeLapse

Video

You don’t need a telescope to enjoy astro-photography.  All it takes is a camera, a tripod and a timer remote controller to take interval images without you having to be there.  I know that most of the image taking is done with the camera connected to a computer.  But this remote controller allows for control of the shutter in the BULB setting without a laptop.  See it as a “grab-n-go”, travel-light type of accessory to the camera.

Canon_tc_80n3_remote_control

Set it up to take a large sequence of shots and you got the makings of a timelapse video.  Because there is no tracking with the tripod, keep the exposures under 10 seconds.  Then use video editing software like Microsoft Movie Maker to covert all those images into a video (see my article here).

It’s always interesting to analyse your frames to determine what you’ve capture, to identify key or important elements.

Wide field of the sky, mountains and horizon from a Montreal south sore suburb. March 4th, 2016. Benoit Guertin

Wide field of the sky, mountains and horizon from a Montreal south sore suburb.
March 4th, 2016. Benoit Guertin

Unfortunately, my camera battery wasn’t fully charged, and the cold drained it quickly, therefore only got about 100 frames in.

Time-lapse Video with Microsoft Movie Maker

Creating a time-lapse video out of your individual photos is a simple matter with Microsoft Movie Maker.  And the cool thing is that it will work with Canon RAW .CR2 format files, so no need to convert them to JPG ahead of time.

The following steps are performed with Windows8.

Step 1 – Select the sequence of images in Microsoft Photo Gallery

timelapse01Step 2 – Under Create select Movie.  This will automatically launch Microsoft Movie Maker with the individual photos loaded in a new Movie Maker Project.

timelapse02

New Movie Maker Project createdtimelapse03

Step 3 – Under Edit Video Tools, change the duration between frames to a value less than 1.0- example 0.20.

timelapse04Step 4 – Save your movie in the format and resolution you wish.  Voila!  And why not add a title, caption and a soundtrack to go the extra mile.

Therefore set your camera on a tripod and start taking some pictures of the night sky.

August 13th Celestial Pole Time Lapse

Video

Couldn’t put all those frames to waste, so I processed and assembled them into a time-lapse video showing the Earth’s rotation and the various layers of clouds flying by.

The video was created with Microsoft MovieMaker, a tool that all Win7 and Win8 users have by default.  So it’s FREE!  Yay!

These were processed in IRIS and saved as BMP, but MovieMaker will also create videos with Canon CR2 RAW Files directly.  Therefore dump all your frame and you can generate an instant video without any processing.  By default it sets 7.0sec delay between images.  Simply select all images and change the value to 0.100 or whatever frame rate you wish.  And then export your video.


Planetary Imaging with a Webcam

Planetary imaging is usually where everyone starts.  The targets are bright objects in the sky such as the Moon and the planets that don’t require long exposures; Venus, Mars, Jupiter and Saturn.  And because there are no long exposures, no need for a mount that tracks.  The electronics of a webcam allows between 5 and 60 frames per second (fps), more than enough to get a good image that can be used with any sized telescope, and the result is a AVI movie that can be easily processed.

There are two ways to use the webcam:

  1. Prime focus: the original webcam lens is removed and the telescope becomes the lens; like swapping lens on a SLR camera.  Magnification is provided by the focal length of the telescope and the optional use of a barlow lens.
  2. Eyepiece projection: the webcam replaces the eye and the magnification is provided by the ratio of telescope focal length to eyepiece focal length.

In my case I went with a prime focus solution, hence I needed a webcam where the original lens could be removed and replaced with an 1.25″ adapter to fit into the telescope’s focuser.

Philips Vesta Pro 680K webcam modified for use on telescope

Philips Vesta Pro 680K webcam modified for use on telescope

The camera sensor, be it CMOS or CCD is sensitive to a wider spectrum than the human eye, therefore most have build-in UV and IR filter, either on the lens or the sensor.  As this filter was on the original webcam lens I purchased a BAADER UV-IR Rejection 1.25″ #2459207 filter for use with the adapter.  Refractors have a challenge getting all colours focused at the same spot, and even with an APO scope what falls in the UV and IR range will generally appear out of focus.  Best to keep those out with a filter.

Today a good planetary imager can be purchased for under $200, but when I started,  most astronomy imaging devices ran in the $1000+ camp.  The Philips Vesta 680K was rather popular as a wonderful man by the name of Steve Chambers figured out how to easily modify the webcam electronic to get much longer exposures.  The Vesta was also equipped with a CCD-based sensor, more sensitive than the CMOS technology used in most webcam.  These modified webcam became to be known as Vesta-SC.

I’ve spotted Jupiter, can I take a photo?  Actually you should take a video.  The reason is that there is a great deal of turbulence in the atmosphere and this causes the image to blur and giggle about.  By taking a video you are doing two things:

  1. Capturing a large quantity of images which can be later processed
  2. May happen upon a brief period of atmospheric stability

Here is a 30 second segment of Jupiter with my setup

I recommend taking a few videos with different settings such that you’ll be able to see after which provided the best results.  Select an uncompressed format such as AVI as to not get compression artifacts, and AVIs are easily broken into individual image frames.

Software such as IRIS or REGISTAX can be used to process the video.  REGISTAX is actually quite good and painless at doing this.  Don’t be intimidated by the large number of settings and parameters, you can get great results out-of-the-box with the default settings.

The process breaks down into 5 steps:

  1. Select your target (what you want the software to track on)
  2. Filter on the frames that have good image quality; only keeping those that are sharp and resemble each other
  3. Align (register) the individual images
  4. Stack the individual images
  5. Wavelet analysis and final brightness/colour balance

Because of the high number of images, you can actually improve image resolution by up-sampling or drizzling the image prior to stacking.  The end result is often an image that can be scaled up by 2x while maintaining resolution.

Wavelet analysis is a type of sharpening, similar to unsharp-mask, but treating each level of granularity as a different “frequency”.  While unsharp-mask is tuned to a specific size of detail, wavelet is able to treat various levels of details as different layers of the image and add the results.

End result:

Jupiter - April 11th, 2015 Benoit Guertin

Jupiter – April 11th, 2015
Benoit Guertin


Creating Diffraction Spikes with GIMP 2.8

Updated procedure to use a transparent background for the brush pattern. Also broke down certain steps into more details.

Benoit Guertin's avatarBen Backyard Astronomy

Updated on November 3rd, 2014

Photos of open star clusters always appear to be more pleasant when stars have diffraction spikes.  But if your telescope does not have support vanes from a secondary mirror you are out of luck.  One solution is to simply tape in a cross pattern some string or fishing line over the dew shield.  Or you can turn to digital enhancement.  Below is a procedure to enhance your photos by digitally adding diffraction spikes using GIMP 2.8. in 8 easy steps!  No special plugin or filter required.

Lets try with my image of M45 – Pleiades taken with a Skywatcher 80ED.

M45 - Pleiades Benoit Guertin M45 – Pleiades
Benoit Guertin

The first step is to create a new “brush” in the shape of diffraction spikes.  To do this, start with new canvas with a transparent background.  In the screen shot below, a new 1000 x 1000 pixel image with Fill with: Transparency

View original post 624 more words

Creating Diffraction Spikes with GIMP 2.8

Updated on November 3rd, 2014

Photos of open star clusters always appear to be more pleasant when stars have diffraction spikes.  But if your telescope does not have support vanes from a secondary mirror you are out of luck.  One solution is to simply tape in a cross pattern some string or fishing line over the dew shield.  Or you can turn to digital enhancement.  Below is a procedure to enhance your photos by digitally adding diffraction spikes using GIMP 2.8. in 8 easy steps!  No special plugin or filter required.

Lets try with my image of M45 – Pleiades taken with a Skywatcher 80ED.

M45 - Pleiades Benoit Guertin

M45 – Pleiades
Benoit Guertin

The first step is to create a new “brush” in the shape of diffraction spikes.  To do this, start with new canvas with a transparent background.  In the screen shot below, a new 1000 x 1000 pixel image with Fill with: Transparency

Create new image with transparent background

Create new image with transparent background

Then draw a grey straight horizontal line.  I’ve used the Pencil Tool to create a thin solid line, 4 pixel width end about 300 pixels length.  To ensure a straight line, click once to mark your starting point and holding the SHIFT+CTRL keys click again for the end point.  Note that my line isn’t centered, that is because the blur performed in the next step will shift the line to the left.

Draw a gray horizontal line

Draw a gray horizontal line

Next use Motion Blur to create the gradient (Filter > Blur > Motion Blur…) The blur angle must be 0 deg such that it’s in the same direction as the line.  In this example I’ve used a blur quantity of 150.

Add motion blur to create the gradient.

Add motion blur to create the gradient.

Duplicate the layer, rotate by 90deg and align both lines to form a cross.  A simple step by step is the following:

  1. Select > All
  2. Edit > Copy
  3. Edit > Paste as > New Layer
  4. Layer > Transform > Rotate 90deg clockwise
  5. Tools > Transform Tools > Move  (now align the vertical line to form a cross)
Duplicate, rotate and align both lines

Duplicate, rotate and align both lines

Once both layers align, you can merge them into a single layer.

Merge down to flatten into a single layer

Merge down to flatten into a single layer

Finally, using the Ellipse Selection Tool, select the cross and Copy to clipboard.  This will automatically assign it to the Clipboard Brush (red arrow and box below).  Note that I have kept the screenshot of my previous version with the black background in the snapshot below to make it easier to see.

GIMP - Diffraction Spike Creation - STEP 4

GIMP – Diffraction Spike Creation – STEP 4

We now have a new brush type that can be used to create diffraction spikes with nothing more than a single click. Yay!  The Paintbrush will show up as a cross but with dotted line (see red arrow in screenshot below).  Size and angle can be adjusted via the Tool Option Box; see below sections with red boxes.  I use the Paintbrush tool to create the spikes.

Now have a new brush to create the diffraction spikes

Now have a new brush to create the diffraction spikes

Now it’s time to get down to business and add those diffraction spikes to the stars.  Start by opening your astrophoto and duplicating into another layer.  This duplicate layer will be blurred and used to transfer the colour information on the spikes.

In the duplicated layer (with the original layer turned off), use a heavy Gaussian Blur (Filter > Blur > Gaussian Blur…) to blend out the colours.  In this example, I used a blur value of 60px.  As the blurring makes the image darker, use the Curves Tool to bring the brightness back up.

Increase brightness after burring

Increase brightness after burring

Result of the blurred layer

Result of the blurred layer

Now create a Layer Mask for this blurred layer.  Select to initialize the Layer Mask to Layer’s alpha channel.

GiMP - Diffraction Spike Creation - STEP 7

GiMP – Diffraction Spike Creation – STEP 7

With both the original and blurred layer visible.  The blurred layer is selected and the blend Mode is set to Screen.  Select to edit the mask of the blurred layer (right mouse-click on the blurred layer), and click on the stars to draw the cross pattern.  A diffraction spike should instantly appear!  As your Brush is the cross pattern, you will see in dotted lines the size and angle.  If you don’t see your cursor, simple adjust the size (ex: 500).

GIMP - Diffraction Spikes Creation - STEP 8

GIMP – Diffraction Spikes Creation – STEP 8

Resulting image after clicking on a few bright stars:

M45 with diffraction spikes added

M45 with diffraction spikes added

Try different settings (a larger pen width for the initial cross pattern) or playing with the quantity of blurring and curve adjustment of the blurred layer.

If you have other improvements or suggestions, please share using the comment field below.

Creating Fake Diffraction Spikes

Status

Benoit Guertin's avatar

Found a way to create fake diffraction spikes using GIMP.  Process comes down to defining a new brush in the shape of a cross, and then using that brush to create spikes in a new layer. Will post a procedure in the next few days.

Creating GIF Animation with Lunar Eclipse Photos

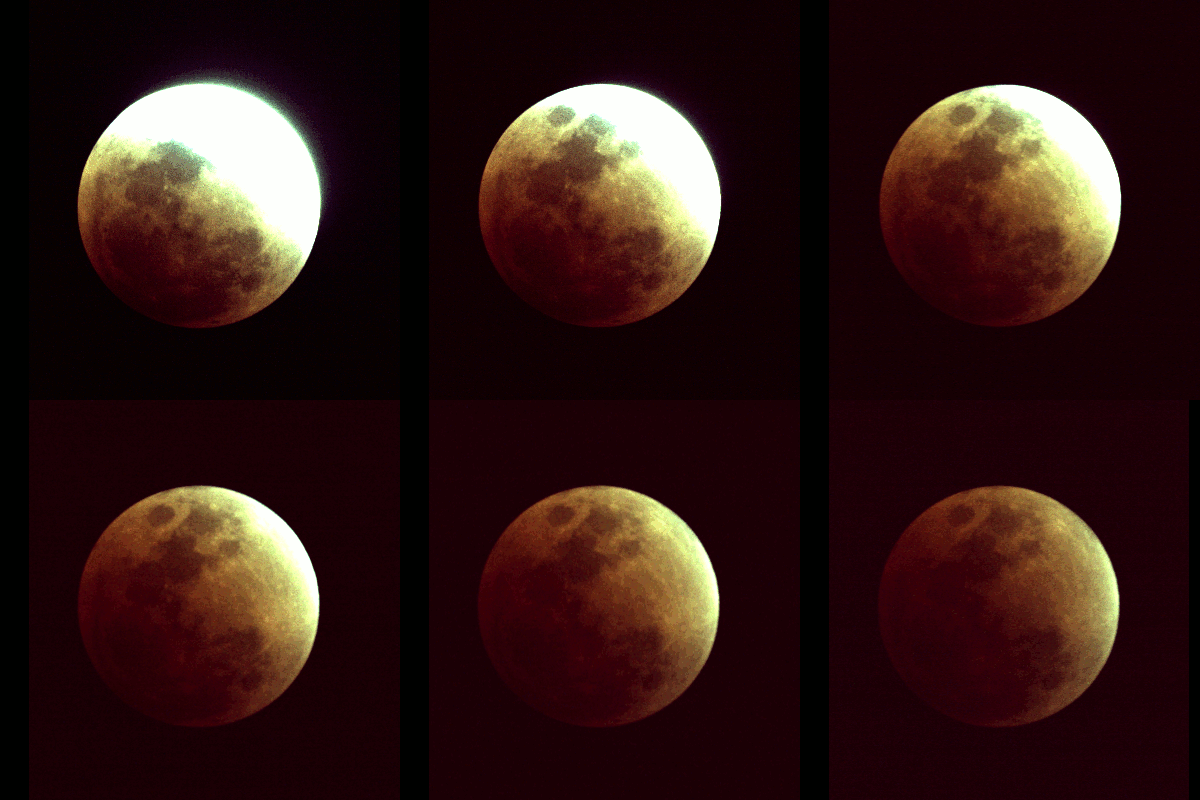
Eclipses happen in a relatively short time span and the change can be dramatic, therefore they are great candidate for GIF animations.  Below is a sequence of 24 individual photos taken with a Skywatcher 80ED telescope and Canon XTi camera from the February 2008 Lunar Eclipse.

Feb 2008 Lunar Eclipse - Benoit Guertin

Feb 2008 Lunar Eclipse – Benoit Guertin

To create the GIF animation I used two software packages:

  1. Registax – astro-imaging processing software used to align the individual images in order to ensure the Moon remains centered.
  2. GIMP – image processing software used to create the GIF animation

In GIMP, GIF animation is done by assigning individual images to a layer.  The animation is therefore build frame-by-frame as it cycles through the layers.  A simple animation tutorial is available to step you through the process.

On the other hand, if you prefer to make a movie, Picasa is capable of creating a video from a series of photos.