Star Trails – Quick and Easy

Creating night-time images with star trails is the easiest and should be your first project when getting into astro photography.
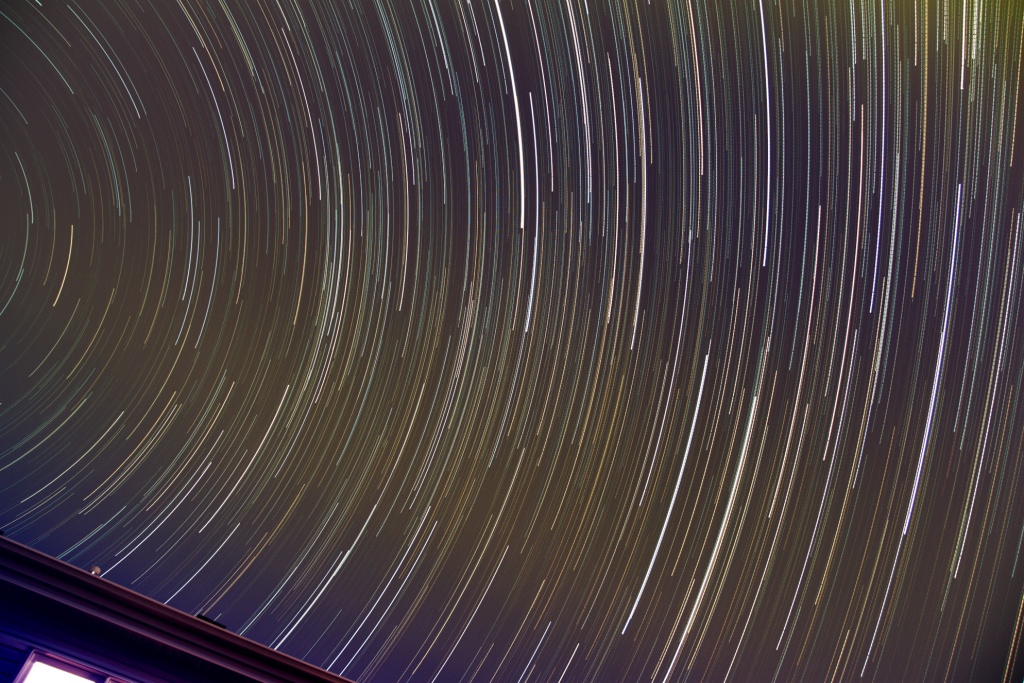
Back in the day of film, you had to stomp down the diaphragm and use a shutter actuator to take one VERY long exposure. And if something happened during that long exposure (bird, plane, clouds, etc…) your photo was ruined. With digital, you can instead take LOTS of short exposures and digitally stitch them together, leaving out the ones that got ruined.

Setup your camera to take a series of short exposure photos, 10 seconds is good. For some tips on how to setup your camera, head over to my Astrophotography Cookbook page.

If you are starting out, or want to simply do this quickly, skip taking Bias, Dark and Flat photos. These are used to improve the final image processing and make more sense when you wish to do some deep sky stacking.

For this exercise I configured the intervalometer of the camera to take 10 second exposures with a 1 second pause between (i.e. the shutter is pressed every 11 seconds and each click is a 10 second exposure). I left the camera operating for a little more than one hour, with the result over 400 photos captured.
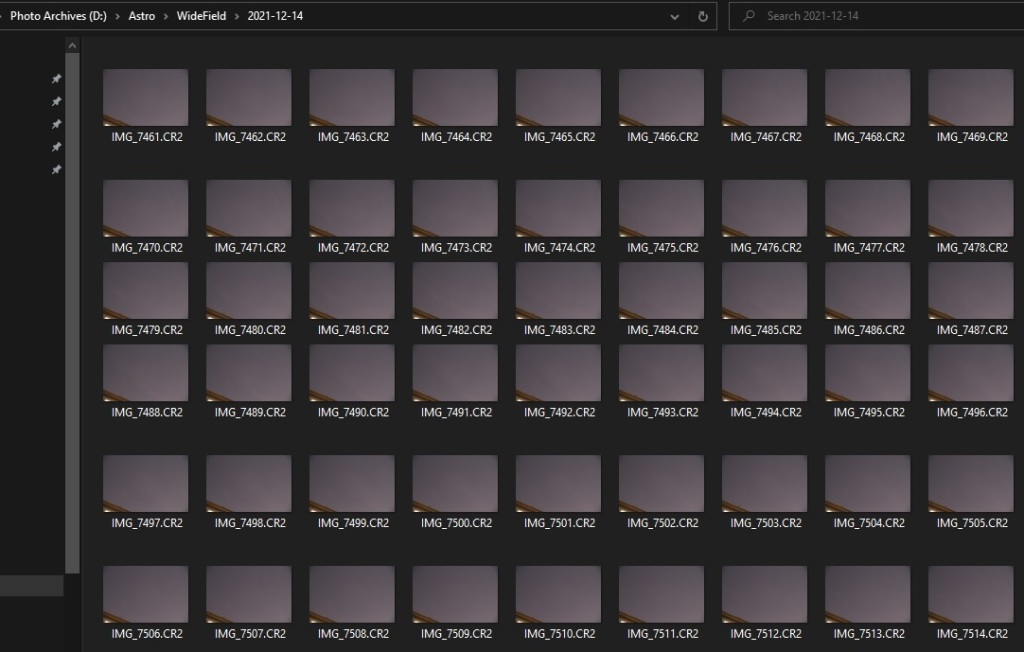
It’s important to review all the photos and note down the ones to exclude from the final image, things like camera movement because you knocked the tripod, a plane, clouds, etc. It’s possible that from the 438 photos taken, only the range 5 to 352 will be good to build the star trail image as clouds decided to roll into view on the 353rd photo.

The next step is to import the photos into Deep Sky Stacker. This is done by using the Open picture files… command. As I mentioned earlier, the dark, flat and bias can be skipped, these are not required. But if you have them, they will improve the quality of the final image. Don’t forget to select Check all before moving to the next step, and to uncheck any photos you want to exclude if you did a bulk import.
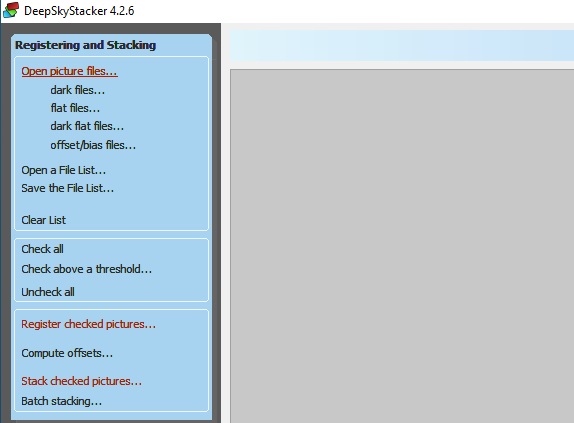
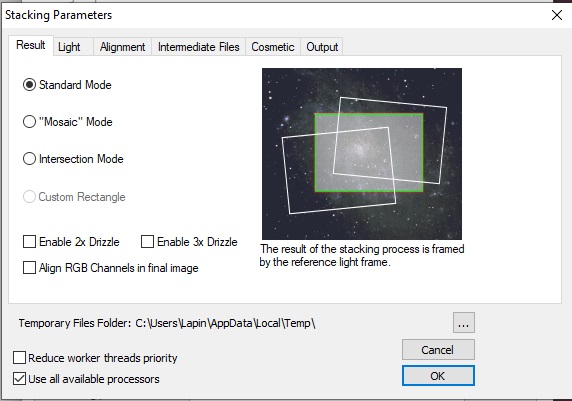
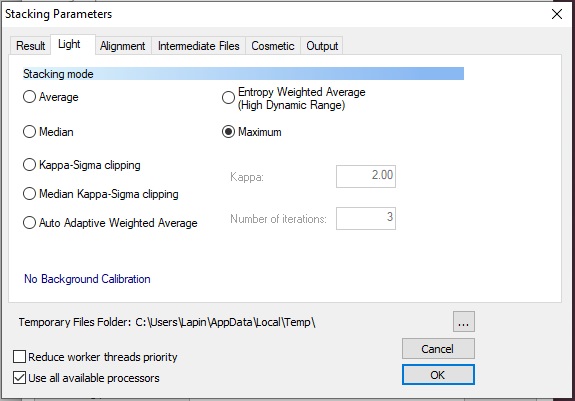
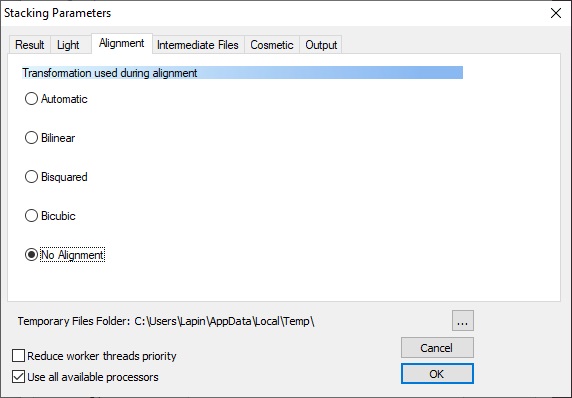
Once the photos are selected, go straight to Stack checked pictures… In the window that pops-up, hit the Stacking parameters… button and select the following:

  • Result – Standard Mode
  • Light – Maximum
  • Alignment – No Alignment

The remaining tabs can remain with the default setting. Hit OK and the program will now start processing all the photos. Note that DSS will still register each image even if you selected No Alignment. If you know how to prevent this waste of time, please tell me in the comment below.

The end result is something like the image below. Base on your the quality of your sky, the camera setting, color balance, etc… various level of work will be required to make it look nice, but you now have something to import into your photo editor and correct all that.
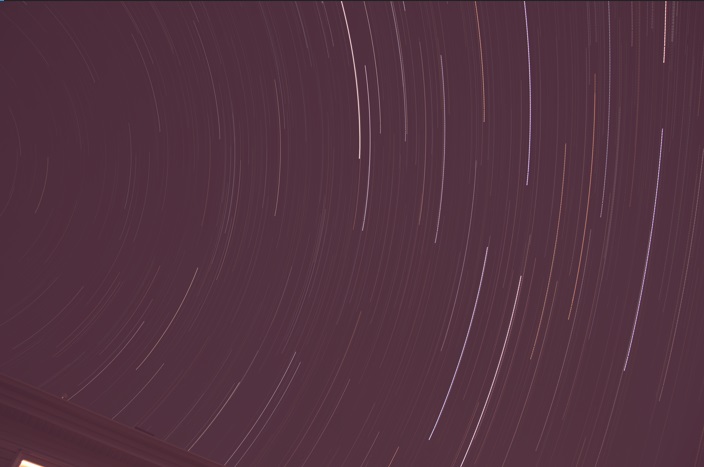
In my Post-processing section of the Astrophotography Cookbook, I provide some tips on how to correct for things like sky gradient.

Clear dark skies!

Updated how to process RAW Moon photos

When I initially wrote the article on dealing with Canon RAW files in Registax, I mentioned to resize the image when converting to 16-bit .TIF format.  However that is not ideal if you want to keep your target object the same size. Playing around with the Canon Digital Photo Professional 4 software I found out that it’s possible to apply the same cropping parameters to each photo, and when batch processed, they get all cropped. Therefore I’ve updated the article to now include the steps to crop instead of resizing to have images small enough for Registax to process it while retaining the original photo resolution.

Astrophotography in the City – Part 3

In Part 2, I explained the steps involved in improving the signal to noise ratio (SNR) by stacking multiple images and removing camera sensor noise (DARK and OFFSET frames). In this third article I will deal with sky gradient removal and white balance.

IRIS is a powerful astrophotography tool, and learning how to use the numerous commands can lead to fantastic photos. You can find good documentation and procedures on the IRIS website, so I won’t go in too much detail here.

While IRIS can process images in 32-bit, it cannot open the 32-bit FIT files generated with DSS. With my image still opened in DSS from the previous step (or by opening the Autosave.fit created by DSS), I select to save the image as a 16-bit FIT such that it can be opened in IRIS.

Below is the result in IRIS, and two things become apparent: 1) the sky has a gradient due to the light pollution from city lights; 2) the sky has a pink hue. These two elements will be corrected in this article.

iris sky gradient

Note, when I opened the image in IRIS, it was inverted, I had to flip it horizontally (menu bar – Geometry/Flip/Horizontal).

The sky gradient removal tool works best when two elements are addressed: 1) nice clean image edge, 2) the background sky is black

Trim the Edge

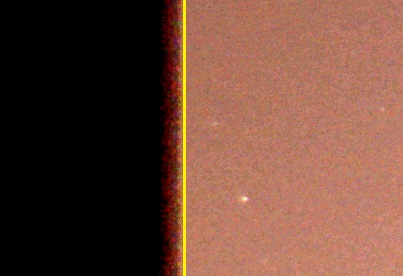
The image needs to have a nice edge around the border (i.e. be smooth all the way to the edge). Hence any dark bands, fuzzy or slopping edges needs to be trimmed. Zooming in on the left part of the image, I will trim at the yellow line, keeping the right-hand part.
photo edge trimming

Typing win at the command prompt within IRIS will give you a cursor to select the two corners to crop your image.

A Black Background

The background needs to be black and have an RGB value near 0. To do that, select a small area in a dark portion of your image, with no stars, and use the black command. This will offset the RGB values to be 0 based on the average within the square you selected. Essentially what you are telling the program is that the darkest portion of your image should be black.

White Balance

The sky gradient removal tool can also correct the background sky color, but before doing so, we need to adjust the white balance such that white stars appear white. To do this correctly you will need a star map (Cartes du ciel, C2A, Stellarium) and locate a star in your image that is as close to our own star color: G2V. This is not exactly for beginners, if you don’t know how, skip and do the white balance later in a photo editor. Once the star located, simply selected it with a small box and use the white command in IRIS.

We perceive a white piece of paper in sunlight to be white, hence light coming from a star of the same spectrum as our Sun should also look white in photos. It’s essentially a white balance exercise, but selecting a star in your image to calibrate instead of most programs which uses the average of the whole image.

Sky Gradient Removal

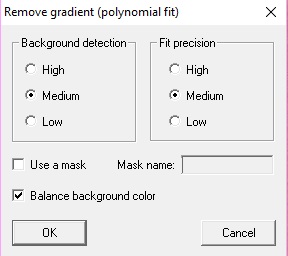
With that done, you can now select from the menu Processing / Remove gradient (polynomial fit) to get the following pop-up

remove gradient

If you have just stars in the image, a Low background detection and Low Fit precision will work.  However if you have intricate details from the Milky Way with dust lanes and all, then a High setting will better preserve the subtle changes. Try various combination to see what works best for your image. You can also do one pass with Low, and then follow it with a 2nd pass at High.

The result of all this is presented below: the sky gradient is gone, and the sky background is now a nicer black instead of a pink hue. And if you did the white balance, then the stars are also of the right color.

iris-completed

ADDED September 11, 2020More information on Sky Gradient Removal

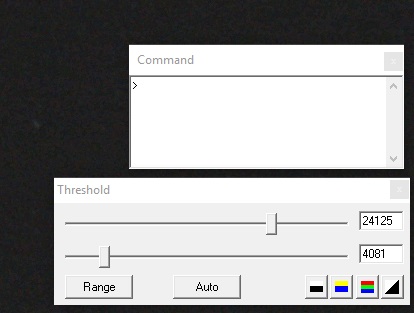
I should mention that the two most important dialog boxes in IRIS are the Command prompt and Threshold. When viewing and performing the various operations, the threshold values (essentially the min/max for brightness and darkness) often needs to be adjusted to get a good image and see the required detail.

iris-command-threshold

The next step will be importing the file in a photo editor for final adjustments. Color saturation, levels and intensity can be adjusted in IRIS, but I find a photo editor to offer better control. And because I will continue my editing in a photo editor do not set the Threshold values too narrow. I prefer a grey sky and then do a non-linear adjustment in a photo editor to get a darker sky.

More to come in another article

DeepSkyStacker – Faster and Better Results (updated)

Tried DeepSkyStacker and I think I’ve found a better and faster way of processing my images.

I had been using IRIS for the better part of the last 6 years, and I remember how impress I was at the results compared to the early versions of Registax for deep sky images.  While  IRIS is quite manual and command-line based, it nevertheless got the job done and allowed me to experiment with different methods.  But now, I decided it was time to move on to something a little modern.  I looked at what others were using, and came across DeepSkyStacker.

DeepSkyStacker

While IRIS offers a complete package, from image acquisition, pre/post-processing, and analysis tools; DeepSkyStacker only performs the registration and stacking.  But it does so in a faster and more efficient way.  DeepSkyStacker can fully utilise RAM and multi-core processing; hence what took 30 minutes in IRIS is now down to 5 minutes in DeepSkyStacker.

It also automates many steps, and you can even save the process and create batches.  So it’s down to load all your files, and then one click to register and stack.

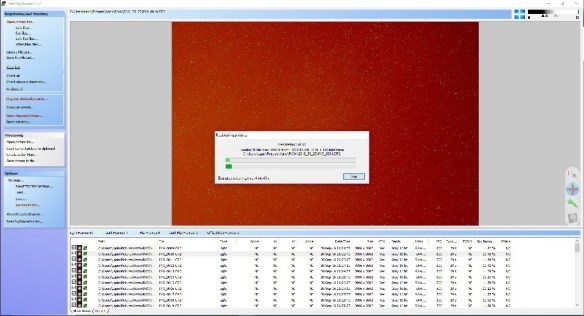
DeepSkyStacker - Processing Files

DeepSkyStacker – Processing Files

I tried the with some wide field of views I had taken back in September.  And the resulting image appeared to be better.  Now I still have to use IRIS as I like how it can remove the sky background gradient and adjust the colors.  And GIMP is still required for the final adjustments.  So here are the main steps that gave me good results:

  1. Load the light, dark, offsets and flat frames (I had no flats or bias/offsets in my trial run, but that didn’t appear to cause an issue)
  2. Ensure that all pictures are checked and select to Register the checked pictures
  3. For the stacking, I found that selecting RGB Channels Background Calibration provided good color, and used the Kappa-Sigma clipping to remove noise.
  4. After stacking DSS will create an Autosave.tif (32-bit TIFF file).  I need to convert this into another format, but without loose the dynamic range.  My current solution is to use Microsoft Photo Gallery to open and save another copy as JPEG.  Finally did a quick stretching of the RGB levels to ensure better dynamic range when saving to 16-bit TIFF.  16-bit TIFF appears to be the only one that will open correctly in IRIS.
  5. Once in the image loaded in IRIS to remove the background sky gradient.  And then save it in BMP format for import into GIMP.  Yes I know I another file format, so far it’s what I find works best.  GIMP converts FITS and TIFF to 8-bit, causing incorrect color depth.
  6. Final adjustments with levels, light curves, saturation, noise filtering, etc.. is done in GIMP.

Now for a little more playing around, and trying it on some on my older pictures.

UPDATE:
DeepSkyStacker saves files in 32-bit TIFF by default.  After stacking many images the dynamic range is quite large, and this is not data we want to loose.  But the problem was finding a program that was able to correctly handle the 32-bit file format.  The next release of GIMP (version 2.10) will handle 32-bit files, but GIMP 2.8 was limited to 16-bit and even there it would convert the image to 8-bit for manipulation (GIMP 2.9.2 and up might work, but needs to be compiles on your computer – development package).  Not good…  Before downloading yet another photo imaging software I tried some of my current programs and found that the  Microsoft Photo Gallery software for Windows 10 does a great job of handling the 32-bit TIFF files.  Once the image opened, under File – Make a Copy I save a version in JPEG.  Yes I know not ideal, but I avoid a lot of the quantization conversion error and I’m able to continue my processing in IRIS and GIMP.


Planetary Imaging with a Webcam

Planetary imaging is usually where everyone starts.  The targets are bright objects in the sky such as the Moon and the planets that don’t require long exposures; Venus, Mars, Jupiter and Saturn.  And because there are no long exposures, no need for a mount that tracks.  The electronics of a webcam allows between 5 and 60 frames per second (fps), more than enough to get a good image that can be used with any sized telescope, and the result is a AVI movie that can be easily processed.

There are two ways to use the webcam:

  1. Prime focus: the original webcam lens is removed and the telescope becomes the lens; like swapping lens on a SLR camera.  Magnification is provided by the focal length of the telescope and the optional use of a barlow lens.
  2. Eyepiece projection: the webcam replaces the eye and the magnification is provided by the ratio of telescope focal length to eyepiece focal length.

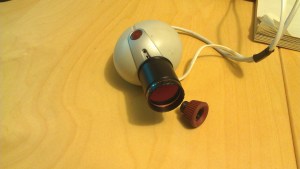
In my case I went with a prime focus solution, hence I needed a webcam where the original lens could be removed and replaced with an 1.25″ adapter to fit into the telescope’s focuser.

Philips Vesta Pro 680K webcam modified for use on telescope

Philips Vesta Pro 680K webcam modified for use on telescope

The camera sensor, be it CMOS or CCD is sensitive to a wider spectrum than the human eye, therefore most have build-in UV and IR filter, either on the lens or the sensor.  As this filter was on the original webcam lens I purchased a BAADER UV-IR Rejection 1.25″ #2459207 filter for use with the adapter.  Refractors have a challenge getting all colours focused at the same spot, and even with an APO scope what falls in the UV and IR range will generally appear out of focus.  Best to keep those out with a filter.

Today a good planetary imager can be purchased for under $200, but when I started,  most astronomy imaging devices ran in the $1000+ camp.  The Philips Vesta 680K was rather popular as a wonderful man by the name of Steve Chambers figured out how to easily modify the webcam electronic to get much longer exposures.  The Vesta was also equipped with a CCD-based sensor, more sensitive than the CMOS technology used in most webcam.  These modified webcam became to be known as Vesta-SC.

I’ve spotted Jupiter, can I take a photo?  Actually you should take a video.  The reason is that there is a great deal of turbulence in the atmosphere and this causes the image to blur and giggle about.  By taking a video you are doing two things:

  1. Capturing a large quantity of images which can be later processed
  2. May happen upon a brief period of atmospheric stability

Here is a 30 second segment of Jupiter with my setup

I recommend taking a few videos with different settings such that you’ll be able to see after which provided the best results.  Select an uncompressed format such as AVI as to not get compression artifacts, and AVIs are easily broken into individual image frames.

Software such as IRIS or REGISTAX can be used to process the video.  REGISTAX is actually quite good and painless at doing this.  Don’t be intimidated by the large number of settings and parameters, you can get great results out-of-the-box with the default settings.

The process breaks down into 5 steps:

  1. Select your target (what you want the software to track on)
  2. Filter on the frames that have good image quality; only keeping those that are sharp and resemble each other
  3. Align (register) the individual images
  4. Stack the individual images
  5. Wavelet analysis and final brightness/colour balance

Because of the high number of images, you can actually improve image resolution by up-sampling or drizzling the image prior to stacking.  The end result is often an image that can be scaled up by 2x while maintaining resolution.

Wavelet analysis is a type of sharpening, similar to unsharp-mask, but treating each level of granularity as a different “frequency”.  While unsharp-mask is tuned to a specific size of detail, wavelet is able to treat various levels of details as different layers of the image and add the results.

End result:

Jupiter - April 11th, 2015 Benoit Guertin

Jupiter – April 11th, 2015
Benoit Guertin


Clear Sky Chart – Can I take my gear out?

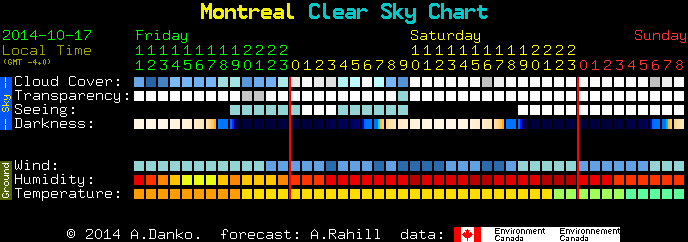
We are all dependent on the weather, and knowing what Mother Nature has in store for us in the next 24hrs helps our daily routine.  Backyard astronomers don’t have the luxury to be setup on top of a mountain range, above the clouds where the air is crisp and dry all the time.  Therefore knowing in advance if it’s worth hauling out all your gear for a six-hour deep-sky photo-session or a minimalist setup to scan the planets and the Moon can save lots of frustration.

One of the great tools out there is Clear Sky Chart.

Clear Sky Chart

Clear Sky Chart

Using data and forecasting models from Environment Canada specifically tailored for astronomers the site provides a simple chart with past, current and forecasted conditions of various parameters that affect the viewing quality.  In the above snap-shot cloud cover, transparency and humidity all indicate bad viewing conditions for Friday and Saturday night. (Boooo…..)

While the data is from Environment Canada, Clear Sky Chart provides coverage for the USA and part of Mexico.  On the web site you can select the closest observation site, or request to create your own.  If your setup is mobile, you can check the viewing conditions at various locations to see if it’s worth to pack up your gear for a road-trip to a place with less light pollution and better weather.

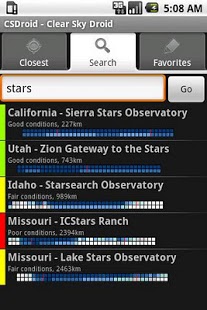
An Android app is also available for your mobile devices and tablets: Clear Sky Droid, essentially using the same charts and data set.

Clear Sky Droid

Clear Sky Droid

As the saying goes: Clear and dark skies!