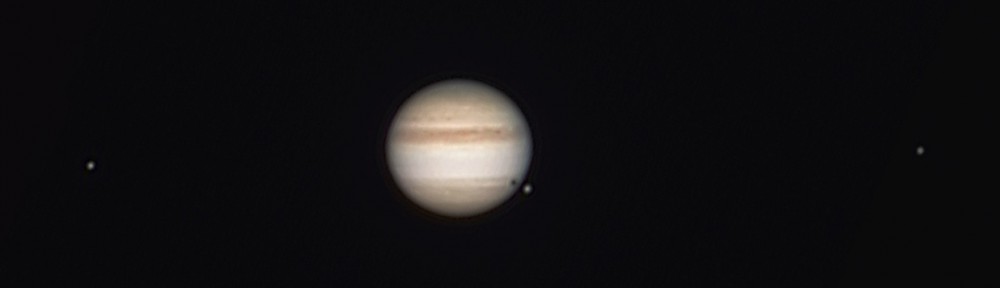
Started processing some of the images taken on April 8th, the only evening with a clear night. I spend a good hour in the near freezing air to capture Jupiter with various settings. The one below was taken with a 2X barlow and a simple webcam. This is a mosaic of two frames as not all moons fit into the rather narrow 640×480 CCD sensor. Unfortunately the fourth moon, Callisto, is just out of the frame to the right.
Jupiter – 2017 opposition – SW80ED and 2x barlow
Telescope: Skywatcher 80ED with 2x barlow lens
Sensor: Philips Vesta webcam with IR-UR cut filter
Processing: Registax and GIMP
Took 40 seconds of video at 20 images/sec which produced a 351MB AVI file. The video is then analysed, registered and stacked with Registax. Color saturation and light levels where then adjusted in GIMP.
I also took many more video with a 3x barlow, but getting the focus right was a challenge. And I’m afraid the end result is just a “bigger” Jupiter, no additional details. I will need a few nights to process those and see which one turned out well. I will also try using the drizzle algorithm on the image above to see if I can get a larger and better image.
Planetary imaging is usually where everyone starts. The targets are bright objects in the sky such as the Moon and the planets that don’t require long exposures; Venus, Mars, Jupiter and Saturn. And because there are no long exposures, no need for a mount that tracks. The electronics of a webcam allows between 5 and 60 frames per second (fps), more than enough to get a good image that can be used with any sized telescope, and the result is a AVI movie that can be easily processed.
There are two ways to use the webcam:
Prime focus: the original webcam lens is removed and the telescope becomes the lens; like swapping lens on a SLR camera. Magnification is provided by the focal length of the telescope and the optional use of a barlow lens.
Eyepiece projection: the webcam replaces the eye and the magnification is provided by the ratio of telescope focal length to eyepiece focal length.
In my case I went with a prime focus solution, hence I needed a webcam where the original lens could be removed and replaced with an 1.25″ adapter to fit into the telescope’s focuser.
Philips Vesta Pro 680K webcam modified for use on telescope
The camera sensor, be it CMOS or CCD is sensitive to a wider spectrum than the human eye, therefore most have build-in UV and IR filter, either on the lens or the sensor. As this filter was on the original webcam lens I purchased a BAADER UV-IR Rejection 1.25″ #2459207 filter for use with the adapter. Refractors have a challenge getting all colours focused at the same spot, and even with an APO scope what falls in the UV and IR range will generally appear out of focus. Best to keep those out with a filter.
Today a good planetary imager can be purchased for under $200, but when I started, most astronomy imaging devices ran in the $1000+ camp. The Philips Vesta 680K was rather popular as a wonderful man by the name of Steve Chambers figured out how to easily modify the webcam electronic to get much longer exposures. The Vesta was also equipped with a CCD-based sensor, more sensitive than the CMOS technology used in most webcam. These modified webcam became to be known as Vesta-SC.
I’ve spotted Jupiter, can I take a photo? Actually you should take a video. The reason is that there is a great deal of turbulence in the atmosphere and this causes the image to blur and giggle about. By taking a video you are doing two things:
Capturing a large quantity of images which can be later processed
May happen upon a brief period of atmospheric stability
Here is a 30 second segment of Jupiter with my setup
I recommend taking a few videos with different settings such that you’ll be able to see after which provided the best results. Select an uncompressed format such as AVI as to not get compression artifacts, and AVIs are easily broken into individual image frames.
Software such as IRIS or REGISTAX can be used to process the video. REGISTAX is actually quite good and painless at doing this. Don’t be intimidated by the large number of settings and parameters, you can get great results out-of-the-box with the default settings.
The process breaks down into 5 steps:
Select your target (what you want the software to track on)
Filter on the frames that have good image quality; only keeping those that are sharp and resemble each other
Align (register) the individual images
Stack the individual images
Wavelet analysis and final brightness/colour balance
Because of the high number of images, you can actually improve image resolution by up-sampling or drizzling the image prior to stacking. The end result is often an image that can be scaled up by 2x while maintaining resolution.
Wavelet analysis is a type of sharpening, similar to unsharp-mask, but treating each level of granularity as a different “frequency”. While unsharp-mask is tuned to a specific size of detail, wavelet is able to treat various levels of details as different layers of the image and add the results.
Welcome to a journey into our Universe with Dr Dave, amateur astronomer and astrophotographer for over 40 years. Astro-imaging, image processing, space science, solar astronomy and public outreach are some of the stops in this journey!