Made a quick tutorial on how to remove background gradient with GIMP
You need the GIMP Astronomy Plugin

Made a quick tutorial on how to remove background gradient with GIMP
You need the GIMP Astronomy Plugin
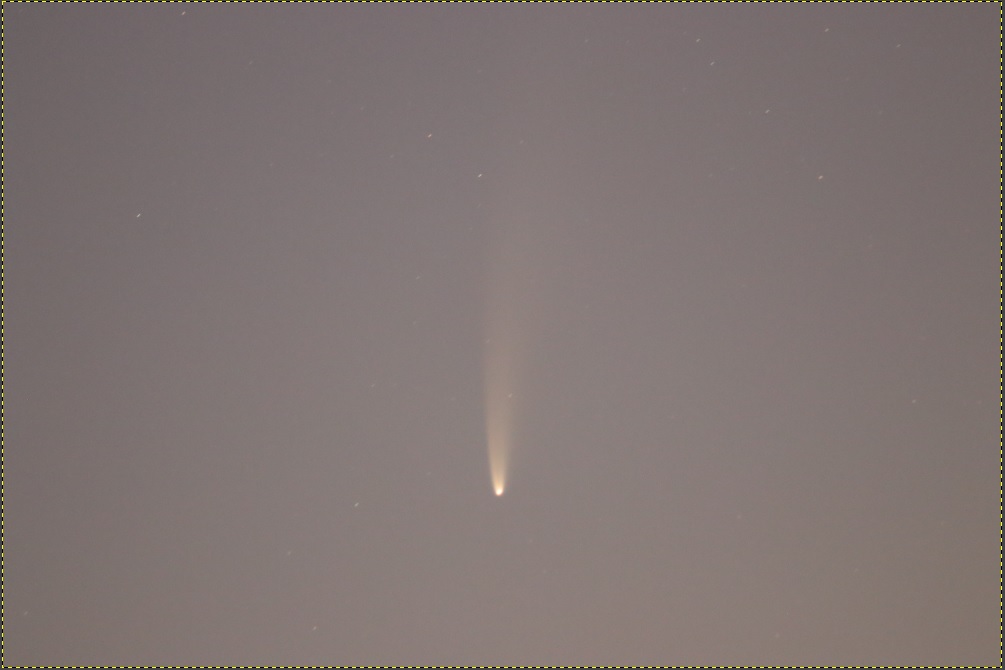
Looking back, the “Great comet of 2020″ C/2020 F3 NEOWISE was a fantastic sight and well worth the 3am alarm to snap some photos back in July. But comet images are notoriously difficult to work with. Should I also add that in older times, comets were often seen as a bad omen, the bearer of bad news? Cough, cough COVID-19 cough…
Anyways, back to astronomy… There are essentially two types of photo registration (alignment) software out there: 1) Deep Sky which uses pin-point stars to perform alignment; 2) Lunar/Planetary uses the large “disk” of a planet or Moon to align based on surface details.
So when you capture long wispy comets like the RAW image below, software like DSS or Registax just can’t cope.
I turned to standard photo-editing software for a manual alignment and stacking. This is essentially opening one “base” image and then adding a 2nd image as a new layer. I change that 2nd layer to be overlaid as a “Difference” and manually align this 2nd layer to match the base layer. Once that is done I change the layer mode to Addition, and then hide this 2nd layer. Repeat the steps for a 3rd, 4th, 5th, etc. layers until you’ve added all your images. Always aligning with the “base” image to ensure no drift.
If you simply add all those layers up, you will get one very bright image because you are adding pixel intensities. You can do that and then work with the Levels and Curves to bring it back down, or if like me, working with GIMP, then use the Py-Astro plug-ins to do the merging and intensity scaling in a single step with a Merge all layers. Py-Astro can be downloaded here. I haven’t explored all that the plugins have to offer, that will hopefully be in another blog.
Stacking 11 individual frames results in an improvement over a single RAW image (image below). With the stacked image, I’m able to work with the intensities to darken the sky while keeping the comet tail bright.

However the sky gradient is pretty bad, due to the camera lens and because at 4am the sun is starting to shine on the horizon. So off to IRIS to correct the background gradient. From GIMP I save the files as a 16BIT FIT that I can use in IRIS. For steps on how to do this, see my blog about how to remove the sky gradient.
After a quick spin in IRIS, I’m back in GIMP for final color and intensity adjustments, I boosted the BLUE layer and adjusted the dark levels for a darker sky.

I’ve mentioned it before that you don’t need a fancy telescope and tracking equatorial mount to get into astrophotography. Simply a camera on a tripod with a short focal lens can do wonders, especially with the high ISO settings in new cameras. A single 10 seconds exposition can reveal lots of stars, however to capture more photons a longer exposure is not better as the stars will become streaks. But one can easily improve the image and get better signal/noise ratio by stacking multiple images.
However, there is one drawback to stacking multiple exposures if you decide to also capture the landscape: Earth rotates, therefore the sky moves while the landscape stays still. If you align the images using the stars, then the landscape becomes a blur. Not the end result that we want. Luckily a quick composition with two layers and a mask solves everything.
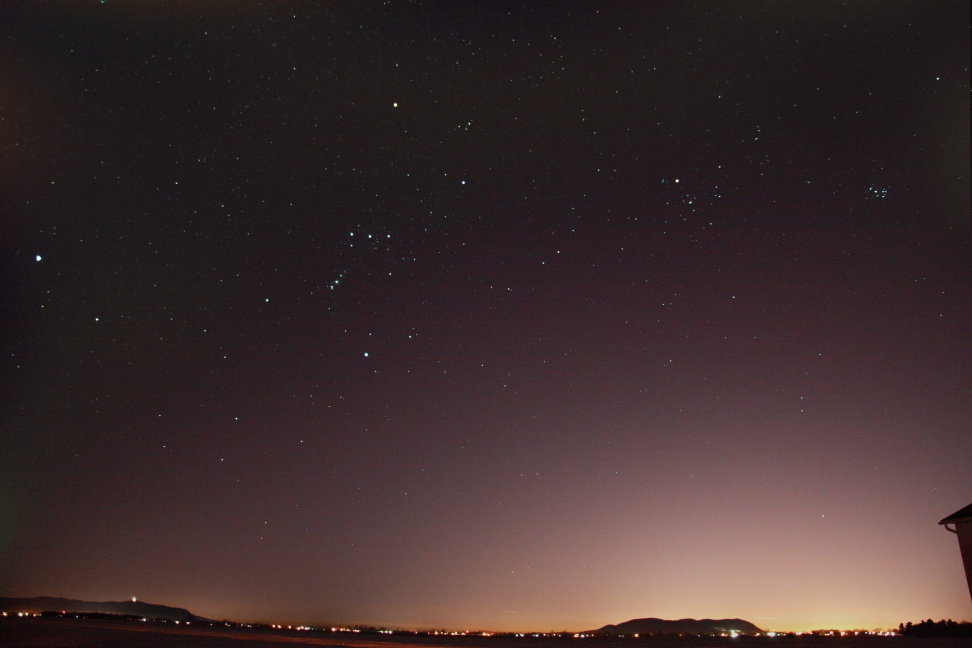
Below is a single 10 seconds exposure at ISO 800 with a 17mm F4 lens; you have the landscape with city lights and the stars above. Yes that is Orion…

Single 10sec exposure (ISO 800)
In order to improve my signal, I worked with IRIS to align and stack 5 frames, this reveals many more stars, but also amplified the light pollution.
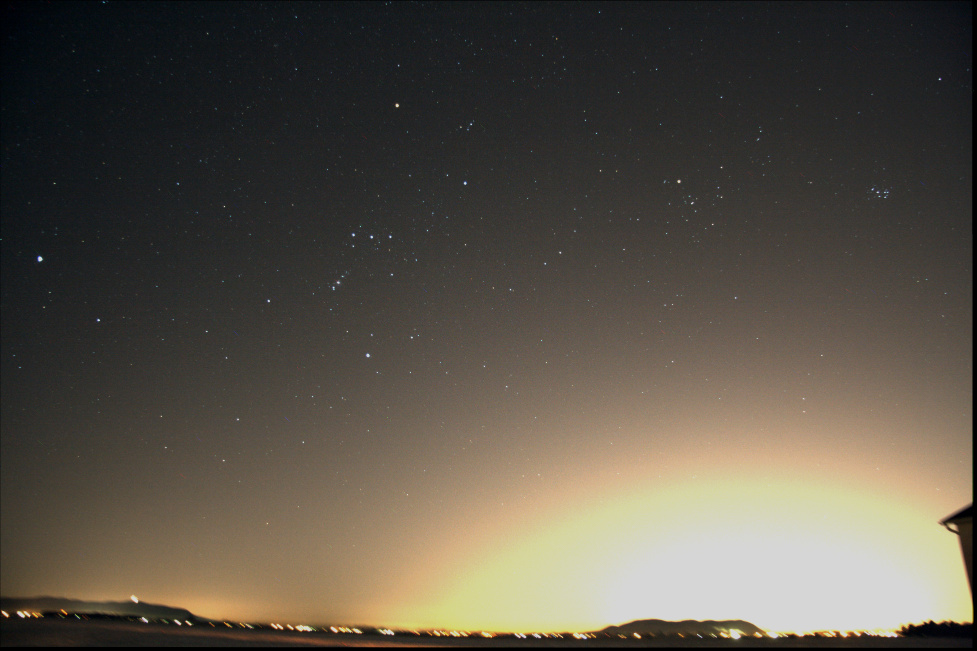
Aligning and stacking 5 images. More stars appear.
Luckily within IRIS there is a function to remove sky gradient. The algorithm takes a series of sample points and attempts to make the sky uniform. Not bad, the images are not a hopeless case.

Removing the sky gradient with IRIS
As mentioned above, the alignment was performed with the stars, hence the background is now blurring. Below is a close-up.
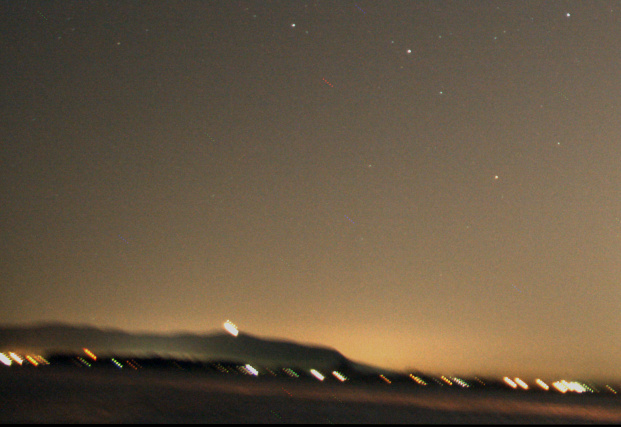
But when aligning on stars, the landscape blurs.
That is just 5 images, stack a much larger quantity or with more time between frames and it will only get worse. It becomes pointless to shoot with the landscape if the end result is blurry. Luckily working with layers in a photo editor can easily solve the issue. We want to keep the stars from the stacked image, but the landscape from a single frame. Follow these easy steps:
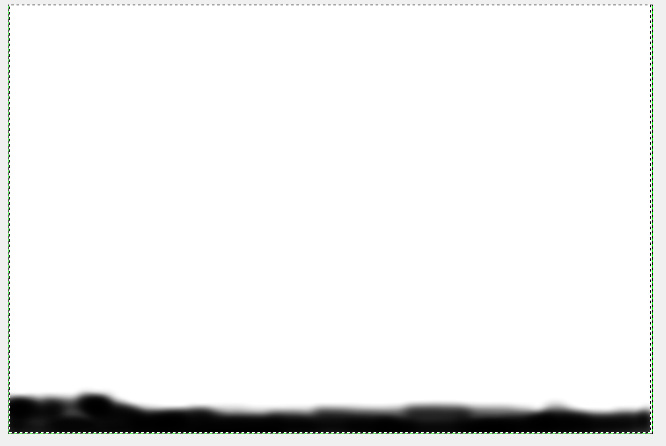
Creating a mask for my layer: white is transparent, black will block
The end result, is improved image of the sky, and a landscape that is still sharp.
Both layers added with the mask
Below is a comparison the composition with stack and layer (left) and a single shot (right). We are able to achieve both of our goals of getting more stars (more signal) while keeping the landscape from becoming a blur.
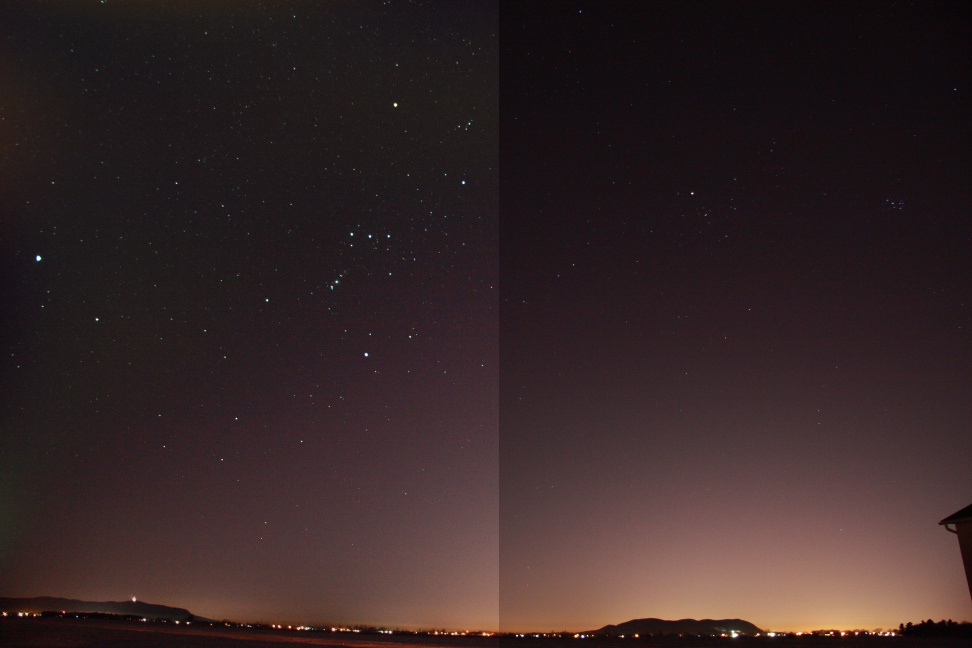
Comparing the composition with layers (left) and single shot (right)
And why not take some time to identify some key features in the image.

Constellations Orion and Taurus above the landscape. (Click to open)
Updated procedure to use a transparent background for the brush pattern. Also broke down certain steps into more details.
Updated on November 3rd, 2014
Photos of open star clusters always appear to be more pleasant when stars have diffraction spikes. But if your telescope does not have support vanes from a secondary mirror you are out of luck. One solution is to simply tape in a cross pattern some string or fishing line over the dew shield. Or you can turn to digital enhancement. Below is a procedure to enhance your photos by digitally adding diffraction spikes using GIMP 2.8. in 8 easy steps! No special plugin or filter required.
Lets try with my image of M45 – Pleiades taken with a Skywatcher 80ED.
 M45 – Pleiades
Benoit Guertin
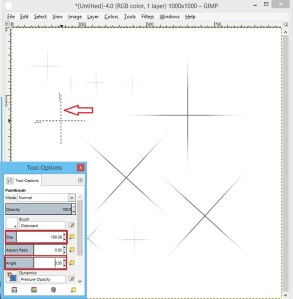
The first step is to create a new “brush” in the shape of diffraction spikes. To do this, start with new canvas with a transparent background. In the screen shot below, a new 1000 x 1000 pixel image with Fill with: Transparency
View original post 624 more words
Updated on November 3rd, 2014
Photos of open star clusters always appear to be more pleasant when stars have diffraction spikes. But if your telescope does not have support vanes from a secondary mirror you are out of luck. One solution is to simply tape in a cross pattern some string or fishing line over the dew shield. Or you can turn to digital enhancement. Below is a procedure to enhance your photos by digitally adding diffraction spikes using GIMP 2.8. in 8 easy steps! No special plugin or filter required.
Lets try with my image of M45 – Pleiades taken with a Skywatcher 80ED.

M45 – Pleiades
Benoit Guertin
The first step is to create a new “brush” in the shape of diffraction spikes. To do this, start with new canvas with a transparent background. In the screen shot below, a new 1000 x 1000 pixel image with Fill with: Transparency

Create new image with transparent background
Then draw a grey straight horizontal line. I’ve used the Pencil Tool to create a thin solid line, 4 pixel width end about 300 pixels length. To ensure a straight line, click once to mark your starting point and holding the SHIFT+CTRL keys click again for the end point. Note that my line isn’t centered, that is because the blur performed in the next step will shift the line to the left.

Draw a gray horizontal line
Next use Motion Blur to create the gradient (Filter > Blur > Motion Blur…) The blur angle must be 0 deg such that it’s in the same direction as the line. In this example I’ve used a blur quantity of 150.

Add motion blur to create the gradient.
Duplicate the layer, rotate by 90deg and align both lines to form a cross. A simple step by step is the following:

Duplicate, rotate and align both lines
Once both layers align, you can merge them into a single layer.

Merge down to flatten into a single layer
Finally, using the Ellipse Selection Tool, select the cross and Copy to clipboard. This will automatically assign it to the Clipboard Brush (red arrow and box below). Note that I have kept the screenshot of my previous version with the black background in the snapshot below to make it easier to see.

GIMP – Diffraction Spike Creation – STEP 4
We now have a new brush type that can be used to create diffraction spikes with nothing more than a single click. Yay! The Paintbrush will show up as a cross but with dotted line (see red arrow in screenshot below). Size and angle can be adjusted via the Tool Option Box; see below sections with red boxes. I use the Paintbrush tool to create the spikes.
Now have a new brush to create the diffraction spikes
Now it’s time to get down to business and add those diffraction spikes to the stars. Start by opening your astrophoto and duplicating into another layer. This duplicate layer will be blurred and used to transfer the colour information on the spikes.
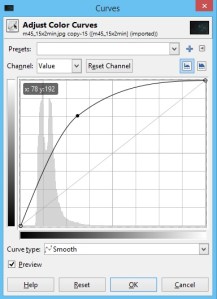
In the duplicated layer (with the original layer turned off), use a heavy Gaussian Blur (Filter > Blur > Gaussian Blur…) to blend out the colours. In this example, I used a blur value of 60px. As the blurring makes the image darker, use the Curves Tool to bring the brightness back up.
Increase brightness after burring

Result of the blurred layer
Now create a Layer Mask for this blurred layer. Select to initialize the Layer Mask to Layer’s alpha channel.

GiMP – Diffraction Spike Creation – STEP 7
With both the original and blurred layer visible. The blurred layer is selected and the blend Mode is set to Screen. Select to edit the mask of the blurred layer (right mouse-click on the blurred layer), and click on the stars to draw the cross pattern. A diffraction spike should instantly appear! As your Brush is the cross pattern, you will see in dotted lines the size and angle. If you don’t see your cursor, simple adjust the size (ex: 500).

GIMP – Diffraction Spikes Creation – STEP 8
Resulting image after clicking on a few bright stars:

M45 with diffraction spikes added
Try different settings (a larger pen width for the initial cross pattern) or playing with the quantity of blurring and curve adjustment of the blurred layer.
If you have other improvements or suggestions, please share using the comment field below.
Found a way to create fake diffraction spikes using GIMP. Process comes down to defining a new brush in the shape of a cross, and then using that brush to create spikes in a new layer. Will post a procedure in the next few days.
Eclipses happen in a relatively short time span and the change can be dramatic, therefore they are great candidate for GIF animations. Below is a sequence of 24 individual photos taken with a Skywatcher 80ED telescope and Canon XTi camera from the February 2008 Lunar Eclipse.

Feb 2008 Lunar Eclipse – Benoit Guertin
To create the GIF animation I used two software packages:
In GIMP, GIF animation is done by assigning individual images to a layer. The animation is therefore build frame-by-frame as it cycles through the layers. A simple animation tutorial is available to step you through the process.
On the other hand, if you prefer to make a movie, Picasa is capable of creating a video from a series of photos.
Mark Bailey
Electronics plus software tips and tricks
Clear Skies and Clean Shutdowns
A site dedicated to learning Astronomy One Step at a Time
Charles Bracken
one post at a time
Astronomy, space and space travel for the non scientist
My adventures with amateur astronomy
Discoveries, Journeys & Milestones in Space Exploration
Welcome to a journey into our Universe with Dr Dave, amateur astronomer and astrophotographer for over 40 years. Astro-imaging, image processing, space science, solar astronomy and public outreach are some of the stops in this journey!
Observations, mostly astronomical from Limavady, UK (55N, 6.9W).
Photography Blog of James Silvester
Astronomy and Amateur Radio
The latest news on WordPress.com and the WordPress community.
