Open Cluster NGC 6633

Open star clusters are the galaxy’s youngest stars. They are created from the collapse of giant molecular gas clouds, often forming large and very hot stars shinning brightly in the blue-white part of the spectrum.  As they are rapidly consuming their fuel, they are also short-lived.  By ending as a super nova, they create the heavier elements beyond carbon that exists all around us.

Below is open star cluster NGC 6633, estimated to be 660 million years old (our solar system is 4.6 billion years old). The cluster is of a decent size covering just about the size of a full Moon in the night sky.  The brighter and whitish stars stand out against older and further stars in the background.

Open Star Cluster NGC 6633

Open Star Cluster NGC 6633

Younger star clusters such as the Pleiades (Messier 45) have yet to burn away their molecular gas clouds.  However there is no hint of glowing gas (nebula) with NGC 6633.

Skywatcher 80ED
Canon Rebel XTi
51x30sec (25.5 minutes) ISO 400

Cassiopeia – the W in the sky

Some constellations are easier to spot than others.  Cassiopeia with its distinctive W is visible year round in the northern hemisphere above the 34th parallel. In the image below it easily stands out from the fainter background stars.

Cassiopeia above the three line - Benoit Guertin

Cassiopeia above the three line – Benoit Guertin

The five stars drawing a W in the sky are all naked eye magnitude 3 and brighter stars, and in the image above I used a layering technique to increase the color and brightness of those stars to really make them stand out.

  1. Duplicate your base image, and set this layer to lighten only
  2. Apply a blur to the top layer(about 8-12 pixels)
  3. Increase the color saturation and brightness.  Play with the curves to brighten the bright stars, but not the background sky.
  4. Use a mask as required to filter out the bright foreground elements, such as light reflecting off a building roof-line in my image above.

Canon Rebel XTi
17mm f/4
4 x 20sec ISO800


This Weekend: 4 Planets in Plain Sight

If you are able to get out of bed early before sunrise and the sky is clear, you can catch a view of our three closest planets, and if you include Earth that makes 4.  Mercury was at the greatest elongation on September 12th (furthest from the Sun when viewed from Earth) which makes it a good time to spot without the glare of the Sun.  But it happens that Mars and Venus are also on that same side of the Sun, making a chanced planetary alignment.

The sky map below [click for larger] shows the position of Mercury, Mars and Venus for the morning of the 16 to the 19 of September.  Bright star Regulus and our Moon are also there to make this a worth-while event, especially on Monday the 18th.

September_AlignmentMars and Mercury will be closest on the 16th, while the 18th will probably be the most photogenic as the Moon will be a thin crescent in the middle of this alignment.

Ursa Major

Ursa Major, or Big Dipper is one of the most recognizable constellation in the Northern hemisphere. People often use it to locate Polaris, the North Star.  Can you find Polaris? (Hint: upper right)

Ursa Major (Big Dipper) low in the sky in late summer around 11pm

Ursa Major (Big Dipper) low in the sky in late summer around 11pm

Canon Rebel XTi (450D)
17mm f/4
Stacking of 4 x 20 seconds @ ISO800
Post processing with GIMP

The Milky Way (Sagittarius to Aquila)

The summer is ideal time to view our galaxy.  Because of Earth’s position with respect to the Milky Way, it runs north-south across the sky.  Anyone with a camera and tripod can easily capture the Milky Way if you are located in a dark area, away for city lights.  We were up north in the Malbaie, Québec area for vacation, so I took some time in the early night to observe and photograph the sky.  Unfortunately, a full Moon was present in early August and the sky would actually brighten past midnight.  The best time was around 11pm for any good viewing and astrophoto. Click on the photo for a high-resolution version.

Milky Way - Sagittarius (just above the trees) to Altair (bright star upper left)

Milky Way – Sagittarius (just above the trees) to Altair (bright star upper left)

Here is a quick run-down of a quick setup if you want to give it a try:

  1. Use as short a focal length as you can, 15mm to 25mm is good.
  2. Set the camera to MANUAL for everything, including the focus and disable any image stabilization. Due to the low light level the camera’s electronic won’t be able to automatically focus or stabilize, so disable them.  It’ll just seek and ruin your setup and photos.
  3. Set the ISO to a high value; 800 on older cameras and 3200 on newer models. Higher ISO will give you a brighter image, but with more noise.  You can test various ISO settings to see which one you are comfortable with.  If you are planning on taking many images and stacking them, you can run with a higher ISO as the stacking process will increase your signal-to-noise ratio.
  4. Set the aperture opening as large as possible. Larger openings bring in more light, but depending on the quality of the optics will distort the stars around the edges of the frame.  If you see that the stars stretch near the edges, simply stomp it down one or two stops. Trial and error is best to find the right setup.  If you’re not sure simply go with a large opening and you can later crop the image if the results isn’t pleasing.
  5. Set to capture in RAW, this is best for post-processing.
  6. Look on your lens and set the focus to infinity; this is where you’ll start. If you don’t know where infinity is, look at a faraway object and manually focus on it.
  7. Mount the camera on a tripod and aim at the desired part of the sky.
  8. If you have live preview, use it to fine-tune the focus to get the stars as small as possible. Don’t forget that you can often ZOOM in on the live preview screen.  If you don’t have live preview (like mine) simply take 3 short test photos (5 seconds each) adjusting the focus in the same direction between each photo. Review the three shots to see which one has the smallest stars and repeat this until you’ve achieved what you believe to be the best image.
  9. Set the exposure time to 20 seconds. With focal lengths in the 15-25mm range the stars will remain relatively round.
  10. Take as many photos as you wish.

You can experience with different setups (F-stop, ISO, focal and exposure lengths) and you’ll be able to review and compare later to see which gives you the best image.  That way the next time you’ll have your GO-TO setup for great shots.

The above was a stack of 4 images taken 17mm F/4, 20 seconds at ISO 800.

I also identified the constellations and some interesting objects in the above shot.

Objects in the Milky Way

Objects in the Milky Way

Solar Eclipse – Post Processing

With the eclipse behind us, and all the gear put away it’s time to transfer and process the images to create something memorable.  I decided to make a mosaic with some of the photos of the eclipse, as well as the visible sun spots. Click on the image below for a high-resolution version.

August 21, 2017 Solar Eclipse

August 21, 2017 Solar Eclipse

The weather cooperated and I had the right gear to get some decent photos. Before the start of the eclipse, the sun presented two observable active sun spot regions: 2671 and 2672. This helped in achieving a proper focus and gave something to observe prior to the start of the eclipse.

Sunspot Region 2671 (right) and 2672 (left)

Sunspot Region 2671 (right) and 2672 (left)

As I had installed and aligned my Vixen equatorial mount the night before, once I had proper focus with the camera, it was child’s play to start an automatic sequence of images every 60 seconds. Hence for the entire solar eclipse, it was hands-off and automated. I could simply glance once in a while at the screen or grab one of the hand-held solar viewers to look up.

58% Cover from the Montreal, Canada Location.

58% Cover from the Montreal, Canada Location.

While the effect was nowhere near that of those in the path of totality, the light level and heat did drop at the peak of the eclipse. The brightness was lower, not like when there are high altitude clouds as the shadows were still sharp and well-defined. And the sun’s rays did feel cooler, a welcomed relief from standing under the sun for the last hour.

In the end, it was a fun experience, especially with the kids. And with over 150 images taken I decided to compile them into two formats. A time-lapse video and a mosaic as seen above.

The video was actually the quickest thing done. With Microsoft Movie Maker, it takes the Canon CR2 RAW files directly and stitches them together into a video. It actually took me longer to find a suitable soundtrack to the clip.

With that experience under my belt, I’m looking forward to April 8th 2024 total solar eclipse that will pass close to home.

Telescope: Skywatcher 80ED with Thousand Oaks R-G solar film
Camera: Canon Rebel XTi (450D)
Setting: 1/1000s at ISO 100

William Optics GT71 f/5.9 Triplet Refractor

My last telescope purchase goes back to about 11 years when I upgraded from a beginner 130mm Newtonian to the 80ED bargain APO refractors launched by Syntha (Orion/Skywatcher) that everyone was raving about. I got one of the light metallic blue Skywatcher (SW80ED) and have been happy with its good optics and versatility for both visual and photographic use. Well actually, I upgraded the focuser as the stock unit didn’t do well with the weight of DSLR, often sliding out of focus or shifting when the tension was adjusted.

Over the past few years I’m been evaluating what should be my next move. From the 80ED there are many possibilities in the $800-$1200 CDN price range:

  • An 8in or 10in fast newton; a good bargain when it comes to pure light gathering power, and the fast ratio is great for photography. However collimation needs to be spot on, and will require frequent adjustments.
  • A 100-110mm doublet refractor will also gather more light and retain the easy of use like the 80ED.
  • Some entry-level catadiaoptric like Ritchey-Chrétien or Schmidt-Cassegrain are interesting with longer focal lengths for planets and galaxies

But with any of these options, the weight of the optic increases, and my current Vixen GP will start to struggle. Changing both telescope and mount was out of the question. I wanted something that could go well with my current gear. Hence a 70-80mm APO triplet started to look interesting, especially the small packages offered by some of the fast ones. After a week under dark skies without my telescope, I decided I needed something portable.  That’s when I jumped on an occasion to grab one of the star party demo units from William Optics: the Gran Turismo 71mm APO Triplet Refractor.

davIt may be a demo, but it looks brand new. Not a scratch on the powder-coat finished white optical tube or even the gold-colored dove-tail. Everything feels solid and the focuser looks like it can easily handle the heaviest DSLR. The SW80ED focuser is screwed to the back of the optical tub while the GT71 is one CNC machined unit, eliminating mis-alignment. As this is designed to be a travel scope, the soft-case that comes with it is very nice, much more portable than my current Orion hard-case. And at 2.2kgs, the weight is well within the range for the Vixen GP mount.

To compare the size, I’ve set it up next to my SW80ED, where it comes to almost half its length. The 80ED shares the same tube as the 100mm version, hence it’s bigger than it needs to be and the dew shield does not retract. Overall, the GT71 is more compact and will pack just about the same viewing power as the SW80ED.

hdr

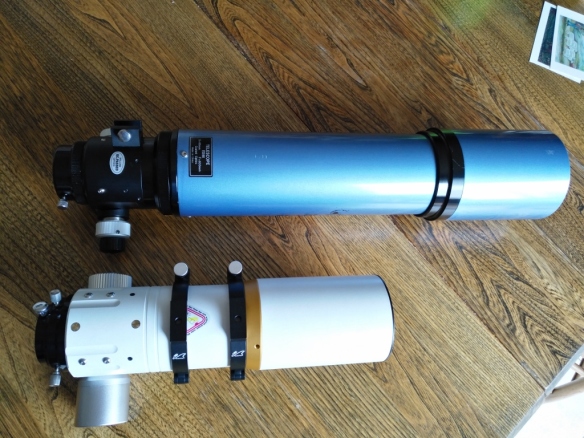
Below is a view of the optics.  While the SW80ED only has about 5 baffles within the tube, the GT71 has a good 30 of them to keep any stray light from ruining the view.  While both use FPL-53 glass, the SW80ED only has it in the rear element, while the GT71 is used for all three optical elements.  The SW80ED provides views free of chromatic aberration, however it’s designed to perform well in the blue and green part of the spectrum.  Anything is the deep red was falling out of focus, especially if a focal reducer was used.  The GT71 will perform better over a wide range of spectrum.

dav

I didn’t travel with my SW80ED, but now with a more compact telescope, I’ll be inclined to simply grab it during for my outings.  I just now need a light alt-az tripod to go with it.

Bummed About Missing Totality? Plan for April 8th 2024

The August 2017 solar eclipse will be special, I’m sure the media coverage has repeated it often enough.  While there is a solar eclipse about every year, it often happens over open ocean or remote places.  The fact that the August 2017 event will sweep across all of the continental United States, where millions will be able to simply look up by heading outdoors, many with easy access to digital cameras and social media to share is what makes it special.

However, if you’re bummed that you won’t be able to witness the total solar eclipse because you’re not in the right spot, fear not!  It will happen again… in 7 years.

Mark April 8th 2024 in your digital calendar.  On the map below, the red line will be the best view, the center of the Moon’s shadow. However any spot between the blue lines will get a total solar eclipse. A different group of States will be the lucky ones this time around. And while the folks in Toronto and Ottawa just falls outside, a short drive will easily get you to a better viewing location.

April 8th, 2024 Eclipse Path

April 8th, 2024 Eclipse Path

So don’t throw away those solar safety glasses you will need them again in 2024. Besides, you can use them every day to track sun spots!

Eclipse Viewing in Canada?

With a week left before the August 21st solar eclipse, some of you may be scrambling to find eclipse viewers to safely view the event. Stores appear to be running out of the necessary viewers and ordering online may not make it in your hands on time.  Also there are reports of poor and unsafe gear being sold on the internet, so do the proper research before ordering.  Both NASA and the American Astronomical Society (AAS) only recognize five manufacturers as meeting the necessary ISO standards for solar safety film, these are: Rainbow Symphony, American Paper Optics, Thousand Oaks Optical, TSE 17 and Baader Planetarium.

July/August SkyNews

July/August SkyNews – includes eclipse viewer

One way to get your hands on eclipse viewers is to find a copy of the July/August SkyNews magazine.  The issue not only has great articles how to prepare, observer and photograph the eclipse, but it comes with a free eclipse viewer.

Alternatively you can join one of the observation parties hosted by astronomy clubs, colleges, museums or stores.  Here is a list from the Royal Astronomical Society of Canada of cities hosting observing events.

Next Year: Lights Out For the Perseids

Yesterday, even if I’m located in the light polluted Montreal suburb, I decided to head out at quarter to midnight to see if I could by chance spot one or two bright meteors from the Perseids shower. As luck would have it in the 15 minutes doesn’t looking around Cassiopeia I spotted two before clouds and a rising moon sent me indoors.

But during that time scanning and waiting, it got me thinking… It took me a good minute to find a suitable spot in my backyard free of the light from the neighbours’ houses and street lights. If there was less light pollution we could have darker skies and everyone could enjoy the show.

During Earth Hour people are asked to turn off the lights for one hour to support the fight for climate change. But I always found that pretty pointless.  If you want to fight climate change, it’s an every day affaire, in your daily routine and the choices you have as a consumer, not one hour in an entire year. So the one hour lights out is more of a gimmick, doesn’t really benefit anyone. But if we had an evening of lights out during the peak of the Perseids meteor shower wouldn’t that be great!

The Perseids falls in August when it’s warm and sitting outside past sunset in the cooling air is enjoyable. Kids don’t have school so they can stay up late. And the patio furniture is out, that’s all the required equipment.

So what do you say? Light out for the 2018 Perseids? I think that’s a worthwhile collective movement.