Blue Moon Lunar Eclipse

The second Full Moon in a month is generally called a Blue Moon. And yes the old saying “once in a Blue Moon” is in reference to this rare event.  Well… if you consider every 2 to 3 years rare. However this one will be extra special because it won’t be blue at all!  It’ll be blood-red because we’ll have a lunar eclipse on our hands!

LunarEclipse_27sep2015

September 27th 2015 Lunar Eclipse

The lunar eclipse will be visible from most of North America, but people out West will be better placed to see it.  In the East, the we’ll only get a partial eclipse as the moon sets in the early morning on Wednesday the January 31st around 6:48am EST.

If you do plan to photograph a lunar eclipse, a tripod is strongly advised, and if you are using a telescope, an equatorial mount is required. The above photo is a single frame at 2.5 second exposure and ISO400 with a Skywatcher 80ED. Yes those are a few stars popping into view during the eclipse.


Astrophotography in the City – Part 3

In Part 2, I explained the steps involved in improving the signal to noise ratio (SNR) by stacking multiple images and removing camera sensor noise (DARK and OFFSET frames). In this third article I will deal with sky gradient removal and white balance.

IRIS is a powerful astrophotography tool, and learning how to use the numerous commands can lead to fantastic photos. You can find good documentation and procedures on the IRIS website, so I won’t go in too much detail here.

While IRIS can process images in 32-bit, it cannot open the 32-bit FIT files generated with DSS. With my image still opened in DSS from the previous step (or by opening the Autosave.fit created by DSS), I select to save the image as a 16-bit FIT such that it can be opened in IRIS.

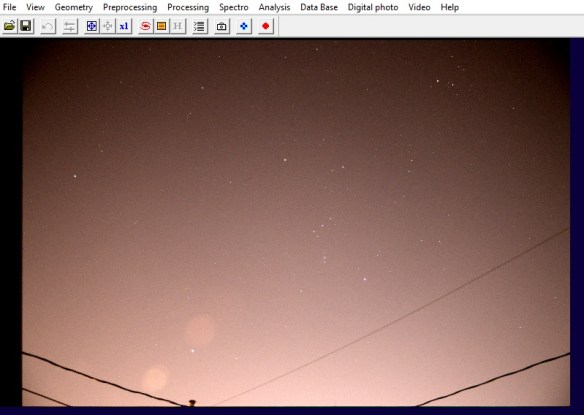
Below is the result in IRIS, and two things become apparent: 1) the sky has a gradient due to the light pollution from city lights; 2) the sky has a pink hue. These two elements will be corrected in this article.

iris sky gradient

Note, when I opened the image in IRIS, it was inverted, I had to flip it horizontally (menu bar – Geometry/Flip/Horizontal).

The sky gradient removal tool works best when two elements are addressed: 1) nice clean image edge, 2) the background sky is black

Trim the Edge

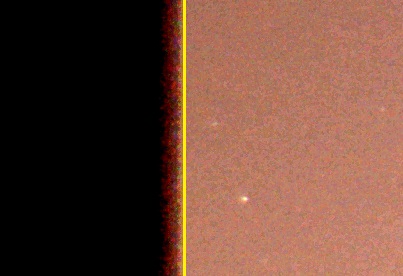
The image needs to have a nice edge around the border (i.e. be smooth all the way to the edge). Hence any dark bands, fuzzy or slopping edges needs to be trimmed. Zooming in on the left part of the image, I will trim at the yellow line, keeping the right-hand part.
photo edge trimming

Typing win at the command prompt within IRIS will give you a cursor to select the two corners to crop your image.

A Black Background

The background needs to be black and have an RGB value near 0. To do that, select a small area in a dark portion of your image, with no stars, and use the black command. This will offset the RGB values to be 0 based on the average within the square you selected. Essentially what you are telling the program is that the darkest portion of your image should be black.

White Balance

The sky gradient removal tool can also correct the background sky color, but before doing so, we need to adjust the white balance such that white stars appear white. To do this correctly you will need a star map (Cartes du ciel, C2A, Stellarium) and locate a star in your image that is as close to our own star color: G2V. This is not exactly for beginners, if you don’t know how, skip and do the white balance later in a photo editor. Once the star located, simply selected it with a small box and use the white command in IRIS.

We perceive a white piece of paper in sunlight to be white, hence light coming from a star of the same spectrum as our Sun should also look white in photos. It’s essentially a white balance exercise, but selecting a star in your image to calibrate instead of most programs which uses the average of the whole image.

Sky Gradient Removal

With that done, you can now select from the menu Processing / Remove gradient (polynomial fit) to get the following pop-up

remove gradient

If you have just stars in the image, a Low background detection and Low Fit precision will work.  However if you have intricate details from the Milky Way with dust lanes and all, then a High setting will better preserve the subtle changes. Try various combination to see what works best for your image. You can also do one pass with Low, and then follow it with a 2nd pass at High.

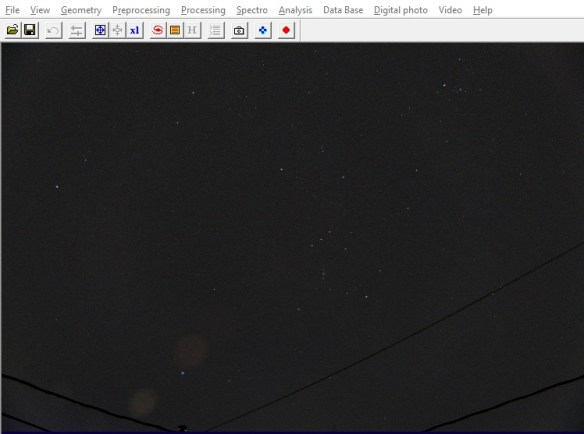
The result of all this is presented below: the sky gradient is gone, and the sky background is now a nicer black instead of a pink hue. And if you did the white balance, then the stars are also of the right color.

iris-completed

ADDED September 11, 2020More information on Sky Gradient Removal

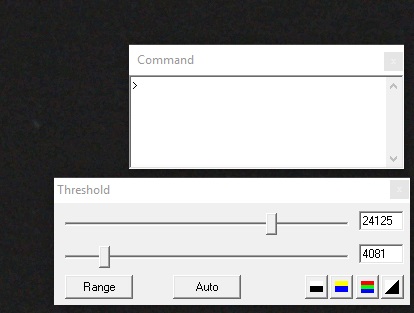
I should mention that the two most important dialog boxes in IRIS are the Command prompt and Threshold. When viewing and performing the various operations, the threshold values (essentially the min/max for brightness and darkness) often needs to be adjusted to get a good image and see the required detail.

iris-command-threshold

The next step will be importing the file in a photo editor for final adjustments. Color saturation, levels and intensity can be adjusted in IRIS, but I find a photo editor to offer better control. And because I will continue my editing in a photo editor do not set the Threshold values too narrow. I prefer a grey sky and then do a non-linear adjustment in a photo editor to get a darker sky.

More to come in another article

Astrophotography in the City – Part 2

Continuing with my series on how to do astrophotography in the city…

In Part 1 I described how to set up the camera and take pictures for astrophotography. So if you’ve followed up to here you should have the following 40 images stored on your camera in RAW format.

– 20 LIGHT frames
– 10 DARK frames
– 10 OFFSET frames

The next step is relatively simple, entirely performed on a computer, you simply have to set it up with the right parameters, the right files and off it goes. The purpose is to register (align) the LIGHT frames and stack them to improve the Signal/Noise Ratio (SNR) such that we can adjust the dynamic range and “tune-out” the unwanted bright sky while keeping the stars.

Register and Stack

There are lots of software out there that can perform the task of registering (aligning) and stacking images.  They all look for pin-point stars in an image and use those as references to align your LIGHT frames such that when they are added, the pin-point stars all stack up correctly.

I’ve used three different software, all of which are free:
IRIS – Very powerful, but not exactly user-friendly. If your camera is 2015 and newer, it may not decode correctly the RAW files. However if you know how to use IRIS, the results can be quite amazing. I will still use IRIS, but that will be in Part 3.
Registax – Works best with planetary and lunar images, especially video is used instead of individual images. However cannot open RAW files.
DeepSkyStacker – (aka DSS) Simple to use, but the resulting image has to be post-processed in an image editor. This is what I use for the Canon 80D and what is described below.

With the Canon 80D, I have to use DeepSkyStacker as IRIS does not correctly decode the  Canon 80D RAW files. With my previous camera (Canon EOS Rebel XTi) I would have gone straight to IRIS for all the processing.

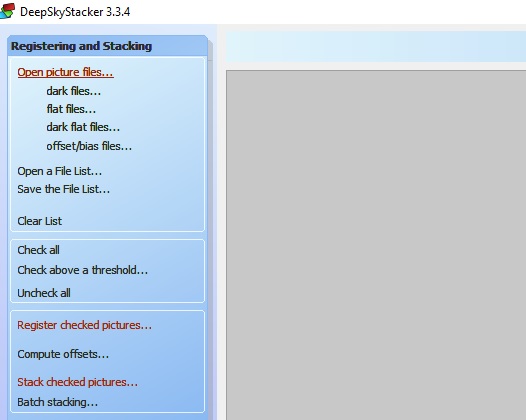
The first step is to open each of the LIGHT, DARK and OFFSET frames with DSS using the upper left menu.

DSS_openfiles

Click on Open picture files and select your LIGHT frames. Then select dark files for your DARK frames and offset/bias files for your OFFSET frames. Once that is done, be sure to select Check all on the left-hand side such that all your files are selected and will be used for processing.

You should see in the lower portion of DSS all your images, tagged respectively Bias/Offset, Dark or Light. More importantly, they should all be checked-marked.

DSS_filelist

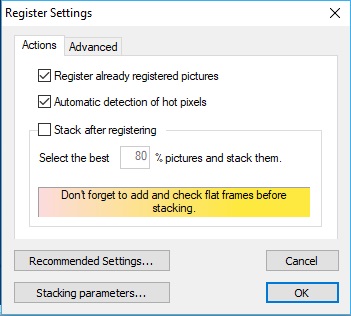
The next step is selecting the Register checked pictures from menu on the left which will bring up this pop-up.

DSS_register

Normally the default settings are good. Essentially DSS will remove the DARK and OFFSET frames from your LIGHT frames, look for stars in each and computer the translation/rotation required to align the stars frame to frame. There needs to be 10 or more stars in each LIGHT frame to be able to align and stack.  If that is not the case, it’s possible to play with the threshold in the Advanced settings in order to detect sufficient number of stars in your LIGHT frames.

After that has completed running, DSS will have evaluated all your images, selected the best one as your reference and unchecked any image that could not be aligned. Next is the stacking.  The following was established through trial and error with my Canon 80D.  You may experiment with different settings to see what each parameter does.

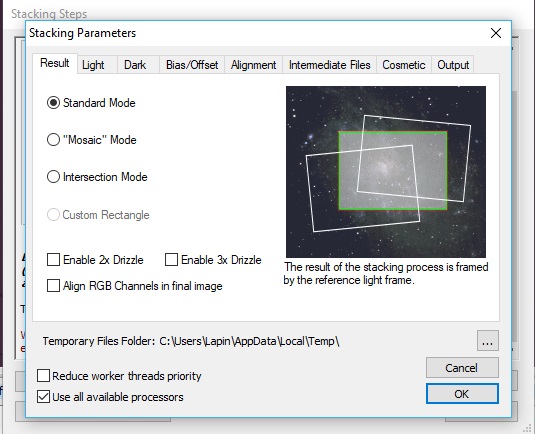
Upon selecting Stack checked pictures, and then selecting Stacking Parameters, the following is presented.

DSS_result
Standard Mode will align and stack the images without cropping.  By default this is selected, and cropping can be done at a later time in photo editing.

For wide-angle DSLR images, don’t bother with the Drizzle options. It’s only good when you want to focus on a small galaxy or nebula within your image. If you use this, you better to select an area of interest to keep the file-size and processing time small.

As a DSLR or consumer camera takes one-shot color images, no use to select Align RGB Channels. This would make sense with a monochrome camera, where individual color filters need to be used

The next tab, Light, is where you can have a good say on the final resulting image. Each setting controls how individual pixels are added between each LIGHT frame.

DSS_light

Average is the fastest, and most basic. However random events that show up in 1 or 2 frames like a satellite, meteor or a plane will still be visible in the final image.  This is a good setting for a quick preview of the final result.

Maximum is perfect when you want to do things like star trails, or see if among your many LIGHT frames you caught something a moving object such as a comet, asteroid, satellite or meteor. It essentially keeps the brightest pixel from each LIGHT frame.

I tend to use Median Kappa-Sigma clipping. For every pixel, it does a distribution of the intensity, and if in a frame that pixel falls out of the standard distribution, the pixel gets replaced by the median value.  It essentially avoids extreme values to mess things up, so  a plane passing in 1 or 2 images, or a satellite streaking by will be eliminated in the processing.  It also makes for more pin-point stars.  In the end, it removes random events from your picture.

From experience, a very important parameter to select is Per Channel Background Calibration.  Light pollution in the city tends to have a pink hue, and this can cause the final image to be skewed into the wrong color with the result being either too red, too green or simply grey.  By selecting Per Channel Background Calibration, each RAW image is decomposed in its RGB components and calibrated to have a BLACK background sky (because the night sky should be black, and not pink from high-pressure sodium lights).

The remaining parameters in the other tabs should be kept as per default, and you are now ready to let DSS do all the data crunching.

Once completed it will load the resulting image, and by default saved it as a .TIF file. This is a 32-bit image, it will be large (over 234MB with the Canon 80D RAW files), and not many programs will open it. Luckily the Win10 default photo viewer can preview it. But what is important is that the registering and stacking process has kept as much of the useful data (light photos entering the camera) while removing the random and sensor electronic noise. As we are not done processing the image, no point is throwing out data just yet by using compression or lower dynamic range.

DSS_stacked

DSS offers capability to adjust the Levels, Luminance and Saturation, but it is best to keeps as is and do this fine adjustment in another program like Photoshop or GIMP.

The next steps will be to continue the processing in other programs:
– IRIS to remove the sky gradient
– GIMP (or Photoshop) to adjust levels, curves and saturation

Continue to Part 3


Astrophotography in the City – Part 1

Most people don’t try astrophotography, shooting the stars and constellations, because they think it requires specialized equipment and dark skies.  While nothing beats getting away from the city and light pollution, anyone with a camera with a MANUAL setting and capability to save RAW files can create nice photos of starry skies even if you live in the city. Below is a quick run-down of a fool-proof recipe: Part 1 – taking pictures.

Astrophotography is heavily dependent on post-processing the images as we are trying to get a desired signal from noise. That noise can be electronics (the camera and sensor) and it can be the light pollution. Like the old saying: garbage in = garbage out. If you can find the right camera settings to reduce noise on your photos, you’ll get fantastic results with much less processing and effort.

original-processed2


Setting up the Camera

DSLR are the best camera to use, but any camera that can set to manual will work. First thing is to set the file to be saved in RAW. Astrophotography is a heavy user of post-processing, so you want to work with as much unaltered data as possible. We want the image as the sensor captured it, and leave the processing to powerful algorithms on a computer.raw-format

Next is to set the camera to full MANUAL mode such that you can control lens aperture, exposure and ISO setting. If you are going to use a remote device to take the pictures, you may need to set it to B or BULB, but for my Canon 80D connected via WiFi to the smart phone, below 30 second exposure time M will work.

manual-modet

Next you want to set the lens opening as big as possible.  For most variable focal zoom lens, that is F4.0, but you may have opted for a fixed lens which can open up to F1.2.  Note however that large openings with consumer photo lens tends to cause either chromatic aberration (colors will “leak” around bright stars) or distorted stars the further towards the edge of the frame.  If you notice this, simply stomp-down to a slower opening by 2 or 3 settings.  Yes that means you get less light, but it’s a trade-off. You can also simply crop the final image at the very end.

Next set the ISO to about 6400.  Can’t go that high? No problem, as long as you can reach ISO 400, you are good. I know, high ISO is very noisy, but the next step is simply to get the right focus, so we don’t care about the noise and with the camera live view, the exposure is not very long and we want to see the stars.

Mount your camera on a tripod as the exposure length will be between 2 and 10 seconds. Hand-holding is OK for the Moon, but not to get nice round stars at those long exposures.  If you don’t have a tripod, setting the camera on a bag of beans or rice, even a bunched-up towel will work. Find a spot where you don’t have glaring lights entering the lens, and aim you camera at the desired spot in the sky.  This is also the time when you set you focus to manual and crank it to infinity.  If there is no marking on the lens for focus at infinity and you don’t know which way to turn, simply pick a distant object like a far away house or light post and manual focus on it. The Moon will also do the trick.

If you have live view mode on the camera, enable it and manually adjust your focus to get nice sharp stars. Some cameras will even allow you to zoom on the preview screen, if so zoom as much as possible and fine-tune the focus. If you don’t see stars: 1) increase the ISO setting, 2) increase the exposure duration, 3) verify that you are at F5 or lower.

If you don’t have live view, simply take a picture and then review it (don’t forget to zoom in on a star). Make a small focus adjustment one way and take another picture.  If the stars are smaller and brighter, you are adjusting the focus in the right direction and keep going until you passed the best setting.  Then simply back-it a small amount.

Getting the Right Exposure

Once the focus is right, the next step is to balance the ISO and exposure length.  The longer the exposure the more the stars will become trails instead of pin-points.  However longer exposures gather more light to capture more stars and faint objects. If you are shooting with a 15mm focal length, you can probably go as high as 20 seconds before it becomes too much of a blur. However at higher focal length the stars will “move” faster, so choose wisely.  Aim for about 5 to 10 seconds of exposure.

Here is where we adjust the ISO.  High ISO setting will generate a noisy image.  In astrophotography we “stack” multiple images to improve the Signal to Noise Ratio (SNR). Hence a noisy high ISO image isn’t so bad, but you still need to keep the noise to a minimum. When we focused with the live view, the ISO was cranked quite high, but this will result in an image with the background sky way too bright. In the image below, the “hump” in the histogram is entirely past the half-way mark in the over-exposure region, this is not good for astronomy post-processing, where we want to have as much dynamic range as possible. As a general rule in astrophotography, you are better off under exposing.
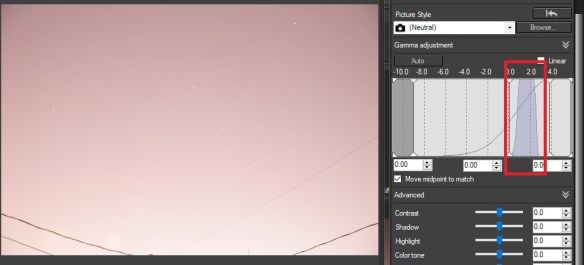
overexposedIn the photo above, I was at ISO 6400 with a 5 second exposure. You can barely make out the constellation Orion in the sky. After reducing both the ISO and the exposure to ISO 3200 and 2 seconds the sky darkens, and pin-point stars start to appear.
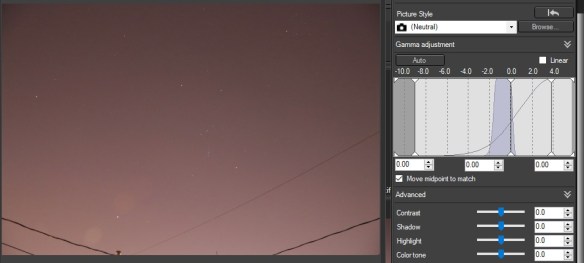
iso3200_2sec

Once you’ve got the right settings, take a series of pictures.  If you can trigger the shutter from your smart phone, tablet, remote or laptop then it’s best as you avoid nudging the camera and smearing the stars. If not, well… go gently. Take about 20 images. These will be your “LIGHT” frames as they are the images you captured light photons.

Once this is done, you need to two other sets of images that will be used in post-processing.

Dark and Offset Frames

With all cameras, the longer the exposure, the more noise and “hot pixels” appear. This noise needs to be removed from the image. Some camera have settings to automatically do this for night shots, but it will do so with every image, doubling the time it takes every image, and the result is not optimal.  Software on your computer is much more powerful than the camera to process and remove the hot pixels, so you are best to take a series of DARK frames yourself.

Hot pixels are essentially pixels “firing off” during a long exposure causing it to create a bright pixel in your image.  Two factors increases the number of hot pixels in an image: 1) exposure length; 2) temperature. Most of your photos with your camera are daytime, short exposures, hence hot-pixels are either non-existent, or not visible. However with a dark sky and exposure in the 5 to 10 seconds range, they will be present.  Temperature will also play a factor, it’s why specialized astro-cameras are Peltier cooled to 40deg C below ambient. Yes, you will get more hot pixels in a summer night shot, then in winter.

Furthermore, all digital cameras uses an electronic circuit with an amplifier to read the sensor.  This amplifier generates heat, which often shows up on the sensor by making one corner brighter than the rest of the image. The longer the exposure, the greater the effect.

DARK frames are REALLY easy to take.  After you are done taking your LIGHT frames, simply put on the lens cap and take another 10 photos with the lens cap on. You are essentially capturing the noise of the sensor when no photons enter the camera. The reason to take a high number like 10 is to generate a MASTER DARK, which will be an average of those 10 dark images, this gets rid of any random elements to the noise.

Last you will also need to take OFFSET frames. These are like the DARK frames explained above, but this time with a short exposure setting like 1/250s.  Here we want to capture the electronic read noise of the sensor.  With such a short exposure, there are no hot pixels or amplifier glow. Yes, still with the lens cap on, so it’s a nearly black image, but there is a bit of signal, a bit of noise registered within it, and this is what we want to isolate. So like the DARK, take another 10 images.

IMPORTANT: Every-time you will do astrophotography, you will need to take DARK frames to match the camera settings and temperature.  However for OFFSET frames, you only need one set per ISO setting. So OFFSETs can be kept for use another day if you took photos with the same ISO setting.

To conclude if you followed the above steps you now have:
– 20 light frames of the night sky
– 10 dark frames
– 10 offset frames

I’ve purposely kept FLAT frames out of this process as they are a pain to take, and if done incorrectly cause more trouble than good, FLAT frames are images of a uniformly lit white surface with no texture or details. The purpose is to capture the shadows on the sensor caused by dust as well as to correct to brightness uniformity and optical imperfections. Lets just keep that out for the time being…

Now head back indoors, it’s time to process these images

Coming this March – Reentry of Chinese Space Station

Its inevitable, what goes up must come down. On average there is one large piece of equipment that re-enters our atmosphere every week. Some are controlled and planned decommissioning of satellites after their useful life. They are purposely commanded for re-entry and burn-up in the atmosphere to avoid adding debris to our already crowded space orbits or worse, cause a collision with another satellite creating an enormous field of debris. Other objects that re-enter are left to fall on their own such as discarded rocket bodies and old satellite that ceased to operate long ago or malfunctioned and can no longer be controlled.

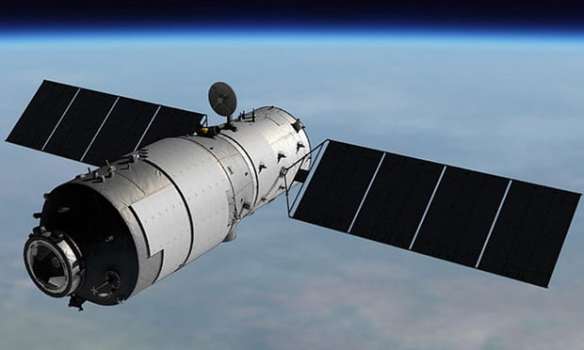
Tiangong-1 : First Chinese space station launched in 2011

Tiangong-1 : First Chinese space station launched in 2011

This coming March the 8,500kg (18,700lbs) Tiangong-1 Chinese space station is coming back to Earth. Launched in September 2011 and used for two manned missions, it suffered a malfunction and the Chinese have not been in control of it since 2016. The space station has been in a decaying orbit ever since, and now below the 300km altitude  where Earth’s atmosphere is causing the space station to slow down due to aerodynamic drag it will soon make its re-entry.

Delta 2 rocket fuel tank surviving re-entry near Georgetown, TX, on 22 January 1997

Delta 2 rocket fuel tank surviving re-entry near Georgetown, TX, on 22 January 1997

Now there is no need to panic. Most of Earth is ocean, and we’ll probably not see anything let alone have a piece of it land in a city. However as this is a fairly large body, there is a good chance  not all pieces will burn up and some may make it to the surface.

This isn’t the first time a space station makes a re-entry.  The American Skylab at 77 tons re-entered in 1979, and Russian Mir (120 tons) made its re-entry in 2001.
For the Mir re-entry, Taco Bell even got it onto the re-entry buzz by anchoring a large

Taco Bell target for Mir re-entry (2001)

target off the Australian coast along the planned re-entry track, and should Mir crash into it there would be free tacos for all Americans. The fast food chain even took out an insurance policy just in case it would happen.

In early January 2018, Tiangong-1 is orbiting at an altitude of around 270-290km (to put that into perspective, ISS is at a 400km orbit) and in a 45 deg orbit, hence the re-entry will be within those latitudes.  The green area in the map below is where Tiangong-1 could make a re-entry, and also marks where the re-entry could be observed.

Tiangong-1 ground coverage - http://www.aerospace.org

Tiangong-1 ground coverage – http://www.aerospace.org

It’s still too early to determine the time and location of potentially crash site, as Earth’s atmosphere is influenced by space weather and swells based on our Sun’s moods, which alters the drag force on the space station.  However various space centers and organizations will continue to track the space station the coming weeks to improve the prediction.

You can follow everything at Aerospace.org for up to date information and predictions.

What could the re-entry look like?  Below is a video shot by NASA of the Japanese Hayabusa spacecraft during a controlled re-entry on June 13, 2010