Continuing with my series on how to do astrophotography in the city…
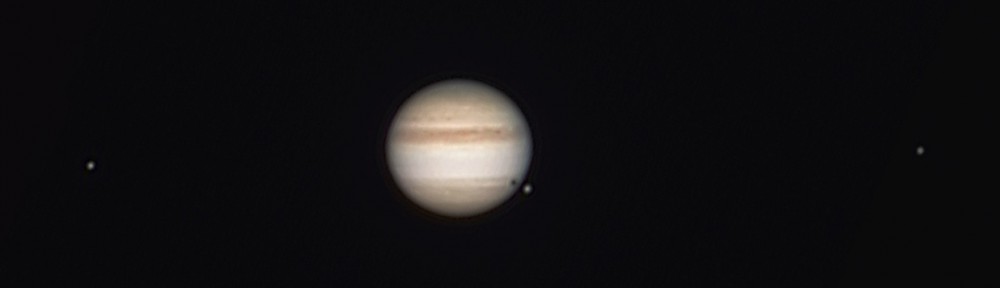
In Part 1 I described how to set up the camera and take pictures for astrophotography. So if you’ve followed up to here you should have the following 40 images stored on your camera in RAW format.
– 20 LIGHT frames
– 10 DARK frames
– 10 OFFSET frames
The next step is relatively simple, entirely performed on a computer, you simply have to set it up with the right parameters, the right files and off it goes. The purpose is to register (align) the LIGHT frames and stack them to improve the Signal/Noise Ratio (SNR) such that we can adjust the dynamic range and “tune-out” the unwanted bright sky while keeping the stars.
Register and Stack
There are lots of software out there that can perform the task of registering (aligning) and stacking images. They all look for pin-point stars in an image and use those as references to align your LIGHT frames such that when they are added, the pin-point stars all stack up correctly.
I’ve used three different software, all of which are free:
IRIS – Very powerful, but not exactly user-friendly. If your camera is 2015 and newer, it may not decode correctly the RAW files. However if you know how to use IRIS, the results can be quite amazing. I will still use IRIS, but that will be in Part 3.
Registax – Works best with planetary and lunar images, especially video is used instead of individual images. However cannot open RAW files.
DeepSkyStacker – (aka DSS) Simple to use, but the resulting image has to be post-processed in an image editor. This is what I use for the Canon 80D and what is described below.
With the Canon 80D, I have to use DeepSkyStacker as IRIS does not correctly decode the Canon 80D RAW files. With my previous camera (Canon EOS Rebel XTi) I would have gone straight to IRIS for all the processing.
The first step is to open each of the LIGHT, DARK and OFFSET frames with DSS using the upper left menu.
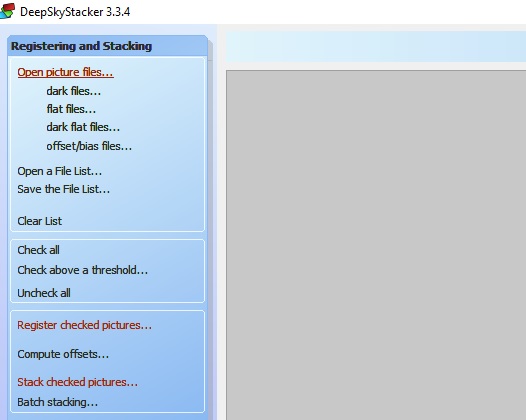
Click on Open picture files and select your LIGHT frames. Then select dark files for your DARK frames and offset/bias files for your OFFSET frames. Once that is done, be sure to select Check all on the left-hand side such that all your files are selected and will be used for processing.
You should see in the lower portion of DSS all your images, tagged respectively Bias/Offset, Dark or Light. More importantly, they should all be checked-marked.

The next step is selecting the Register checked pictures from menu on the left which will bring up this pop-up.
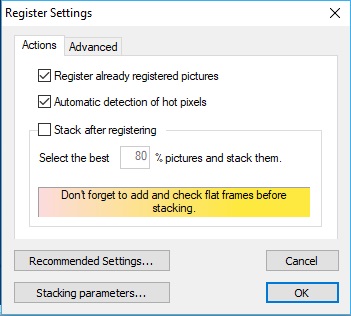
Normally the default settings are good. Essentially DSS will remove the DARK and OFFSET frames from your LIGHT frames, look for stars in each and computer the translation/rotation required to align the stars frame to frame. There needs to be 10 or more stars in each LIGHT frame to be able to align and stack. If that is not the case, it’s possible to play with the threshold in the Advanced settings in order to detect sufficient number of stars in your LIGHT frames.
After that has completed running, DSS will have evaluated all your images, selected the best one as your reference and unchecked any image that could not be aligned. Next is the stacking. The following was established through trial and error with my Canon 80D. You may experiment with different settings to see what each parameter does.
Upon selecting Stack checked pictures, and then selecting Stacking Parameters, the following is presented.
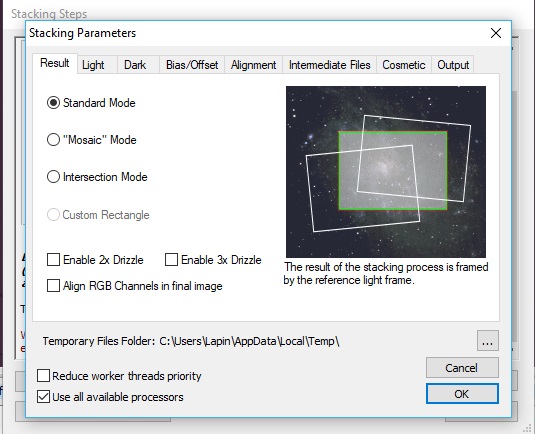
Standard Mode will align and stack the images without cropping. By default this is selected, and cropping can be done at a later time in photo editing.
For wide-angle DSLR images, don’t bother with the Drizzle options. It’s only good when you want to focus on a small galaxy or nebula within your image. If you use this, you better to select an area of interest to keep the file-size and processing time small.
As a DSLR or consumer camera takes one-shot color images, no use to select Align RGB Channels. This would make sense with a monochrome camera, where individual color filters need to be used
The next tab, Light, is where you can have a good say on the final resulting image. Each setting controls how individual pixels are added between each LIGHT frame.

Average is the fastest, and most basic. However random events that show up in 1 or 2 frames like a satellite, meteor or a plane will still be visible in the final image. This is a good setting for a quick preview of the final result.
Maximum is perfect when you want to do things like star trails, or see if among your many LIGHT frames you caught something a moving object such as a comet, asteroid, satellite or meteor. It essentially keeps the brightest pixel from each LIGHT frame.
I tend to use Median Kappa-Sigma clipping. For every pixel, it does a distribution of the intensity, and if in a frame that pixel falls out of the standard distribution, the pixel gets replaced by the median value. It essentially avoids extreme values to mess things up, so a plane passing in 1 or 2 images, or a satellite streaking by will be eliminated in the processing. It also makes for more pin-point stars. In the end, it removes random events from your picture.
From experience, a very important parameter to select is Per Channel Background Calibration. Light pollution in the city tends to have a pink hue, and this can cause the final image to be skewed into the wrong color with the result being either too red, too green or simply grey. By selecting Per Channel Background Calibration, each RAW image is decomposed in its RGB components and calibrated to have a BLACK background sky (because the night sky should be black, and not pink from high-pressure sodium lights).
The remaining parameters in the other tabs should be kept as per default, and you are now ready to let DSS do all the data crunching.
Once completed it will load the resulting image, and by default saved it as a .TIF file. This is a 32-bit image, it will be large (over 234MB with the Canon 80D RAW files), and not many programs will open it. Luckily the Win10 default photo viewer can preview it. But what is important is that the registering and stacking process has kept as much of the useful data (light photos entering the camera) while removing the random and sensor electronic noise. As we are not done processing the image, no point is throwing out data just yet by using compression or lower dynamic range.

DSS offers capability to adjust the Levels, Luminance and Saturation, but it is best to keeps as is and do this fine adjustment in another program like Photoshop or GIMP.
The next steps will be to continue the processing in other programs:
– IRIS to remove the sky gradient
– GIMP (or Photoshop) to adjust levels, curves and saturation

