
Most people don’t try astrophotography, shooting the stars and constellations, because they think it requires specialized equipment and dark skies. While nothing beats getting away from the city and light pollution, anyone with a camera with a MANUAL setting and capability to save RAW files can create nice photos of starry skies even if you live in the city. Below is a quick run-down of a fool-proof recipe: Part 1 – taking pictures.
Astrophotography is heavily dependent on post-processing the images as we are trying to get a desired signal from noise. That noise can be electronics (the camera and sensor) and it can be the light pollution. Like the old saying: garbage in = garbage out. If you can find the right camera settings to reduce noise on your photos, you’ll get fantastic results with much less processing and effort.

Setting up the Camera
DSLR are the best camera to use, but any camera that can set to manual will work. First thing is to set the file to be saved in RAW. Astrophotography is a heavy user of post-processing, so you want to work with as much unaltered data as possible. We want the image as the sensor captured it, and leave the processing to powerful algorithms on a computer.
Next is to set the camera to full MANUAL mode such that you can control lens aperture, exposure and ISO setting. If you are going to use a remote device to take the pictures, you may need to set it to B or BULB, but for my Canon 80D connected via WiFi to the smart phone, below 30 second exposure time M will work.

Next you want to set the lens opening as big as possible. For most variable focal zoom lens, that is F4.0, but you may have opted for a fixed lens which can open up to F1.2. Note however that large openings with consumer photo lens tends to cause either chromatic aberration (colors will “leak” around bright stars) or distorted stars the further towards the edge of the frame. If you notice this, simply stomp-down to a slower opening by 2 or 3 settings. Yes that means you get less light, but it’s a trade-off. You can also simply crop the final image at the very end.
Next set the ISO to about 6400. Can’t go that high? No problem, as long as you can reach ISO 400, you are good. I know, high ISO is very noisy, but the next step is simply to get the right focus, so we don’t care about the noise and with the camera live view, the exposure is not very long and we want to see the stars.
Mount your camera on a tripod as the exposure length will be between 2 and 10 seconds. Hand-holding is OK for the Moon, but not to get nice round stars at those long exposures. If you don’t have a tripod, setting the camera on a bag of beans or rice, even a bunched-up towel will work. Find a spot where you don’t have glaring lights entering the lens, and aim you camera at the desired spot in the sky. This is also the time when you set you focus to manual and crank it to infinity. If there is no marking on the lens for focus at infinity and you don’t know which way to turn, simply pick a distant object like a far away house or light post and manual focus on it. The Moon will also do the trick.
If you have live view mode on the camera, enable it and manually adjust your focus to get nice sharp stars. Some cameras will even allow you to zoom on the preview screen, if so zoom as much as possible and fine-tune the focus. If you don’t see stars: 1) increase the ISO setting, 2) increase the exposure duration, 3) verify that you are at F5 or lower.
If you don’t have live view, simply take a picture and then review it (don’t forget to zoom in on a star). Make a small focus adjustment one way and take another picture. If the stars are smaller and brighter, you are adjusting the focus in the right direction and keep going until you passed the best setting. Then simply back-it a small amount.
Getting the Right Exposure
Once the focus is right, the next step is to balance the ISO and exposure length. The longer the exposure the more the stars will become trails instead of pin-points. However longer exposures gather more light to capture more stars and faint objects. If you are shooting with a 15mm focal length, you can probably go as high as 20 seconds before it becomes too much of a blur. However at higher focal length the stars will “move” faster, so choose wisely. Aim for about 5 to 10 seconds of exposure.
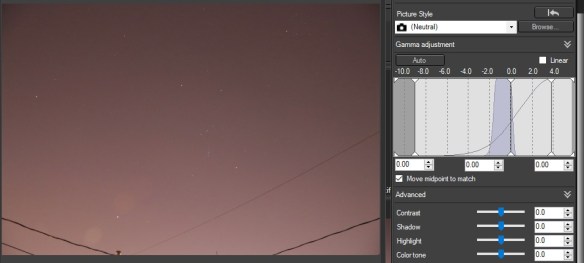
Here is where we adjust the ISO. High ISO setting will generate a noisy image. In astrophotography we “stack” multiple images to improve the Signal to Noise Ratio (SNR). Hence a noisy high ISO image isn’t so bad, but you still need to keep the noise to a minimum. When we focused with the live view, the ISO was cranked quite high, but this will result in an image with the background sky way too bright. In the image below, the “hump” in the histogram is entirely past the half-way mark in the over-exposure region, this is not good for astronomy post-processing, where we want to have as much dynamic range as possible. As a general rule in astrophotography, you are better off under exposing.
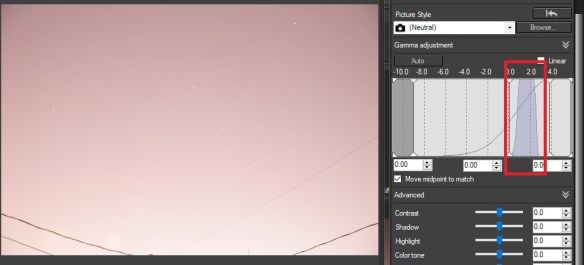 In the photo above, I was at ISO 6400 with a 5 second exposure. You can barely make out the constellation Orion in the sky. After reducing both the ISO and the exposure to ISO 3200 and 2 seconds the sky darkens, and pin-point stars start to appear.
Once you’ve got the right settings, take a series of pictures. If you can trigger the shutter from your smart phone, tablet, remote or laptop then it’s best as you avoid nudging the camera and smearing the stars. If not, well… go gently. Take about 20 images. These will be your “LIGHT” frames as they are the images you captured light photons.
Once this is done, you need to two other sets of images that will be used in post-processing.
Dark and Offset Frames
With all cameras, the longer the exposure, the more noise and “hot pixels” appear. This noise needs to be removed from the image. Some camera have settings to automatically do this for night shots, but it will do so with every image, doubling the time it takes every image, and the result is not optimal. Software on your computer is much more powerful than the camera to process and remove the hot pixels, so you are best to take a series of DARK frames yourself.
Hot pixels are essentially pixels “firing off” during a long exposure causing it to create a bright pixel in your image. Two factors increases the number of hot pixels in an image: 1) exposure length; 2) temperature. Most of your photos with your camera are daytime, short exposures, hence hot-pixels are either non-existent, or not visible. However with a dark sky and exposure in the 5 to 10 seconds range, they will be present. Temperature will also play a factor, it’s why specialized astro-cameras are Peltier cooled to 40deg C below ambient. Yes, you will get more hot pixels in a summer night shot, then in winter.
Furthermore, all digital cameras uses an electronic circuit with an amplifier to read the sensor. This amplifier generates heat, which often shows up on the sensor by making one corner brighter than the rest of the image. The longer the exposure, the greater the effect.
DARK frames are REALLY easy to take. After you are done taking your LIGHT frames, simply put on the lens cap and take another 10 photos with the lens cap on. You are essentially capturing the noise of the sensor when no photons enter the camera. The reason to take a high number like 10 is to generate a MASTER DARK, which will be an average of those 10 dark images, this gets rid of any random elements to the noise.
Last you will also need to take OFFSET frames. These are like the DARK frames explained above, but this time with a short exposure setting like 1/250s. Here we want to capture the electronic read noise of the sensor. With such a short exposure, there are no hot pixels or amplifier glow. Yes, still with the lens cap on, so it’s a nearly black image, but there is a bit of signal, a bit of noise registered within it, and this is what we want to isolate. So like the DARK, take another 10 images.
IMPORTANT: Every-time you will do astrophotography, you will need to take DARK frames to match the camera settings and temperature. However for OFFSET frames, you only need one set per ISO setting. So OFFSETs can be kept for use another day if you took photos with the same ISO setting.
To conclude if you followed the above steps you now have:
– 20 light frames of the night sky
– 10 dark frames
– 10 offset frames
I’ve purposely kept FLAT frames out of this process as they are a pain to take, and if done incorrectly cause more trouble than good, FLAT frames are images of a uniformly lit white surface with no texture or details. The purpose is to capture the shadows on the sensor caused by dust as well as to correct to brightness uniformity and optical imperfections. Lets just keep that out for the time being…
Now head back indoors, it’s time to process these images…

Pingback: Astrophotography in the City – Part 2 | Ben Backyard Astronomy