August 13th Celestial Pole Time Lapse

Video

Couldn’t put all those frames to waste, so I processed and assembled them into a time-lapse video showing the Earth’s rotation and the various layers of clouds flying by.

The video was created with Microsoft MovieMaker, a tool that all Win7 and Win8 users have by default.  So it’s FREE!  Yay!

These were processed in IRIS and saved as BMP, but MovieMaker will also create videos with Canon CR2 RAW Files directly.  Therefore dump all your frame and you can generate an instant video without any processing.  By default it sets 7.0sec delay between images.  Simply select all images and change the value to 0.100 or whatever frame rate you wish.  And then export your video.


August 13th – Celestial Pole Over the House

Image

The Perseids peak had already passed, but the sky was better so I decided to set up the trusty Canon XTi and see if I could catch some meteors.  This time instead of pointing the camera straight up, I decided to frame the top of the house to provide some reference.

Out of the over 120 shots taken, a sequence of 30 frames were without clouds obscuring the stars.  This was a perfect opportunity to mark the celestial pole by adding the images without alignment.

Celestial Pole on August 13, 2015 30 x 30sec

Celestial Pole on August 13, 2015
30 x 30sec

Canon XTi
17mm F4.0 ISO800
30 x 30sec

August 12th – No Perseids but did get some constellations

Image

The 2015 Perseids were predicted to be great, largely thanks to Mother Nature turning off its night-light (aka our Moon).  Unfortunately the weather wasn’t as cooperative…  With clouds over the horizon I knew my window to try to capture some Perseids was quickly vanishing.  Nevertheless I setup my camera on a tripod and hoped for the best.

The best I got was 13 shots without clouds.  A quick scan of them did not reveal any notable meteor streak.  But it wasn’t all a waste.  I was able to process, align and stack them to provide a good 60deg field of view around the zenith.

Constellations Draco, Lyra, Cygnus and Vulpecula 13 x 30sec (17mm F4.0 ISO400) 12-aug-2015 Benoit Guertin

Constellations Draco, Lyra, Cygnus and Vulpecula
13 x 30sec (17mm F4.0 ISO400)
Benoit Guertin

Canon XTi
17mm F4.0 ISO400
13 x 30sec
Fixed mount, no tracking

Faint Images of Galaxies M95 and M96

Image

Galaxies are always a challenge… Imaging objects such as nebulas within our galaxy is much better suited to my small telescope.  At 700mm focal length, galaxies over 30 million light years away are rather small and lack detail.  Nevertheless this is my go at Messier 95 and 96 in the constellation of the Lion.

These galaxies were discovered by Pierre Méchain in 1781 with a 12in telescope, nearly 4 times the size of mine.

Galaxies Messier 95 and 96 - Benoit Guertin

Galaxies Messier 95 and 96 – Benoit Guertin

The image was scaled to 30% and I’ve added insets of the galaxies.

Telescope: Sky-Watcher 80ED
Camera: Canon XTi (ISO 400)
Image: 30 x 30sec

Messier 67 – Open Cluster

Image

On the same night that I imaged Messier 44 I decided to hop over to another nearby open cluster: Messier 67.  While M44 appears three times larger, both of these open clusters are estimated to be of roughly the same size, but M67 happens to be 5 to 6 times farther away.

Click on the image to get the full image, it’s scaled and cropped below.

Open Cluster Messier 67 Benoit Guertin

Open Cluster Messier 67
Benoit Guertin

Telescope: Sky-Watcher 80ED
Camera: Canon XTi (ISO 400)
Image: 19 x 30sec

Messier 44 – Beehive Cluster

Image

A few days ago after taking some video of Jupiter with a modified webcam, I slewed over to the open cluster Messier 44 also known as the Beehive Cluster and changed over to the Canon XTi to take some long exposures.

Below is the result of stacking 20 x 30sec exposures at ISO 400.

Messier 44 - Open Cluster Benoit Guertin

Messier 44 – Open Cluster
Benoit Guertin

Telescope: Sky-Watcher 80ED
Camera: Canon XTi – ISO 400
Image: 20 x 30sec

Creating Diffraction Spikes with GIMP 2.8

Updated procedure to use a transparent background for the brush pattern. Also broke down certain steps into more details.

Benoit Guertin's avatarBen Backyard Astronomy

Updated on November 3rd, 2014

Photos of open star clusters always appear to be more pleasant when stars have diffraction spikes.  But if your telescope does not have support vanes from a secondary mirror you are out of luck.  One solution is to simply tape in a cross pattern some string or fishing line over the dew shield.  Or you can turn to digital enhancement.  Below is a procedure to enhance your photos by digitally adding diffraction spikes using GIMP 2.8. in 8 easy steps!  No special plugin or filter required.

Lets try with my image of M45 – Pleiades taken with a Skywatcher 80ED.

M45 - Pleiades Benoit Guertin M45 – Pleiades
Benoit Guertin

The first step is to create a new “brush” in the shape of diffraction spikes.  To do this, start with new canvas with a transparent background.  In the screen shot below, a new 1000 x 1000 pixel image with Fill with: Transparency

View original post 624 more words

Creating Diffraction Spikes with GIMP 2.8

Updated on November 3rd, 2014

Photos of open star clusters always appear to be more pleasant when stars have diffraction spikes.  But if your telescope does not have support vanes from a secondary mirror you are out of luck.  One solution is to simply tape in a cross pattern some string or fishing line over the dew shield.  Or you can turn to digital enhancement.  Below is a procedure to enhance your photos by digitally adding diffraction spikes using GIMP 2.8. in 8 easy steps!  No special plugin or filter required.

Lets try with my image of M45 – Pleiades taken with a Skywatcher 80ED.

M45 - Pleiades Benoit Guertin

M45 – Pleiades
Benoit Guertin

The first step is to create a new “brush” in the shape of diffraction spikes.  To do this, start with new canvas with a transparent background.  In the screen shot below, a new 1000 x 1000 pixel image with Fill with: Transparency

Create new image with transparent background

Create new image with transparent background

Then draw a grey straight horizontal line.  I’ve used the Pencil Tool to create a thin solid line, 4 pixel width end about 300 pixels length.  To ensure a straight line, click once to mark your starting point and holding the SHIFT+CTRL keys click again for the end point.  Note that my line isn’t centered, that is because the blur performed in the next step will shift the line to the left.

Draw a gray horizontal line

Draw a gray horizontal line

Next use Motion Blur to create the gradient (Filter > Blur > Motion Blur…) The blur angle must be 0 deg such that it’s in the same direction as the line.  In this example I’ve used a blur quantity of 150.

Add motion blur to create the gradient.

Add motion blur to create the gradient.

Duplicate the layer, rotate by 90deg and align both lines to form a cross.  A simple step by step is the following:

  1. Select > All
  2. Edit > Copy
  3. Edit > Paste as > New Layer
  4. Layer > Transform > Rotate 90deg clockwise
  5. Tools > Transform Tools > Move  (now align the vertical line to form a cross)
Duplicate, rotate and align both lines

Duplicate, rotate and align both lines

Once both layers align, you can merge them into a single layer.

Merge down to flatten into a single layer

Merge down to flatten into a single layer

Finally, using the Ellipse Selection Tool, select the cross and Copy to clipboard.  This will automatically assign it to the Clipboard Brush (red arrow and box below).  Note that I have kept the screenshot of my previous version with the black background in the snapshot below to make it easier to see.

GIMP - Diffraction Spike Creation - STEP 4

GIMP – Diffraction Spike Creation – STEP 4

We now have a new brush type that can be used to create diffraction spikes with nothing more than a single click. Yay!  The Paintbrush will show up as a cross but with dotted line (see red arrow in screenshot below).  Size and angle can be adjusted via the Tool Option Box; see below sections with red boxes.  I use the Paintbrush tool to create the spikes.

Now have a new brush to create the diffraction spikes

Now have a new brush to create the diffraction spikes

Now it’s time to get down to business and add those diffraction spikes to the stars.  Start by opening your astrophoto and duplicating into another layer.  This duplicate layer will be blurred and used to transfer the colour information on the spikes.

In the duplicated layer (with the original layer turned off), use a heavy Gaussian Blur (Filter > Blur > Gaussian Blur…) to blend out the colours.  In this example, I used a blur value of 60px.  As the blurring makes the image darker, use the Curves Tool to bring the brightness back up.

Increase brightness after burring

Increase brightness after burring

Result of the blurred layer

Result of the blurred layer

Now create a Layer Mask for this blurred layer.  Select to initialize the Layer Mask to Layer’s alpha channel.

GiMP - Diffraction Spike Creation - STEP 7

GiMP – Diffraction Spike Creation – STEP 7

With both the original and blurred layer visible.  The blurred layer is selected and the blend Mode is set to Screen.  Select to edit the mask of the blurred layer (right mouse-click on the blurred layer), and click on the stars to draw the cross pattern.  A diffraction spike should instantly appear!  As your Brush is the cross pattern, you will see in dotted lines the size and angle.  If you don’t see your cursor, simple adjust the size (ex: 500).

GIMP - Diffraction Spikes Creation - STEP 8

GIMP – Diffraction Spikes Creation – STEP 8

Resulting image after clicking on a few bright stars:

M45 with diffraction spikes added

M45 with diffraction spikes added

Try different settings (a larger pen width for the initial cross pattern) or playing with the quantity of blurring and curve adjustment of the blurred layer.

If you have other improvements or suggestions, please share using the comment field below.
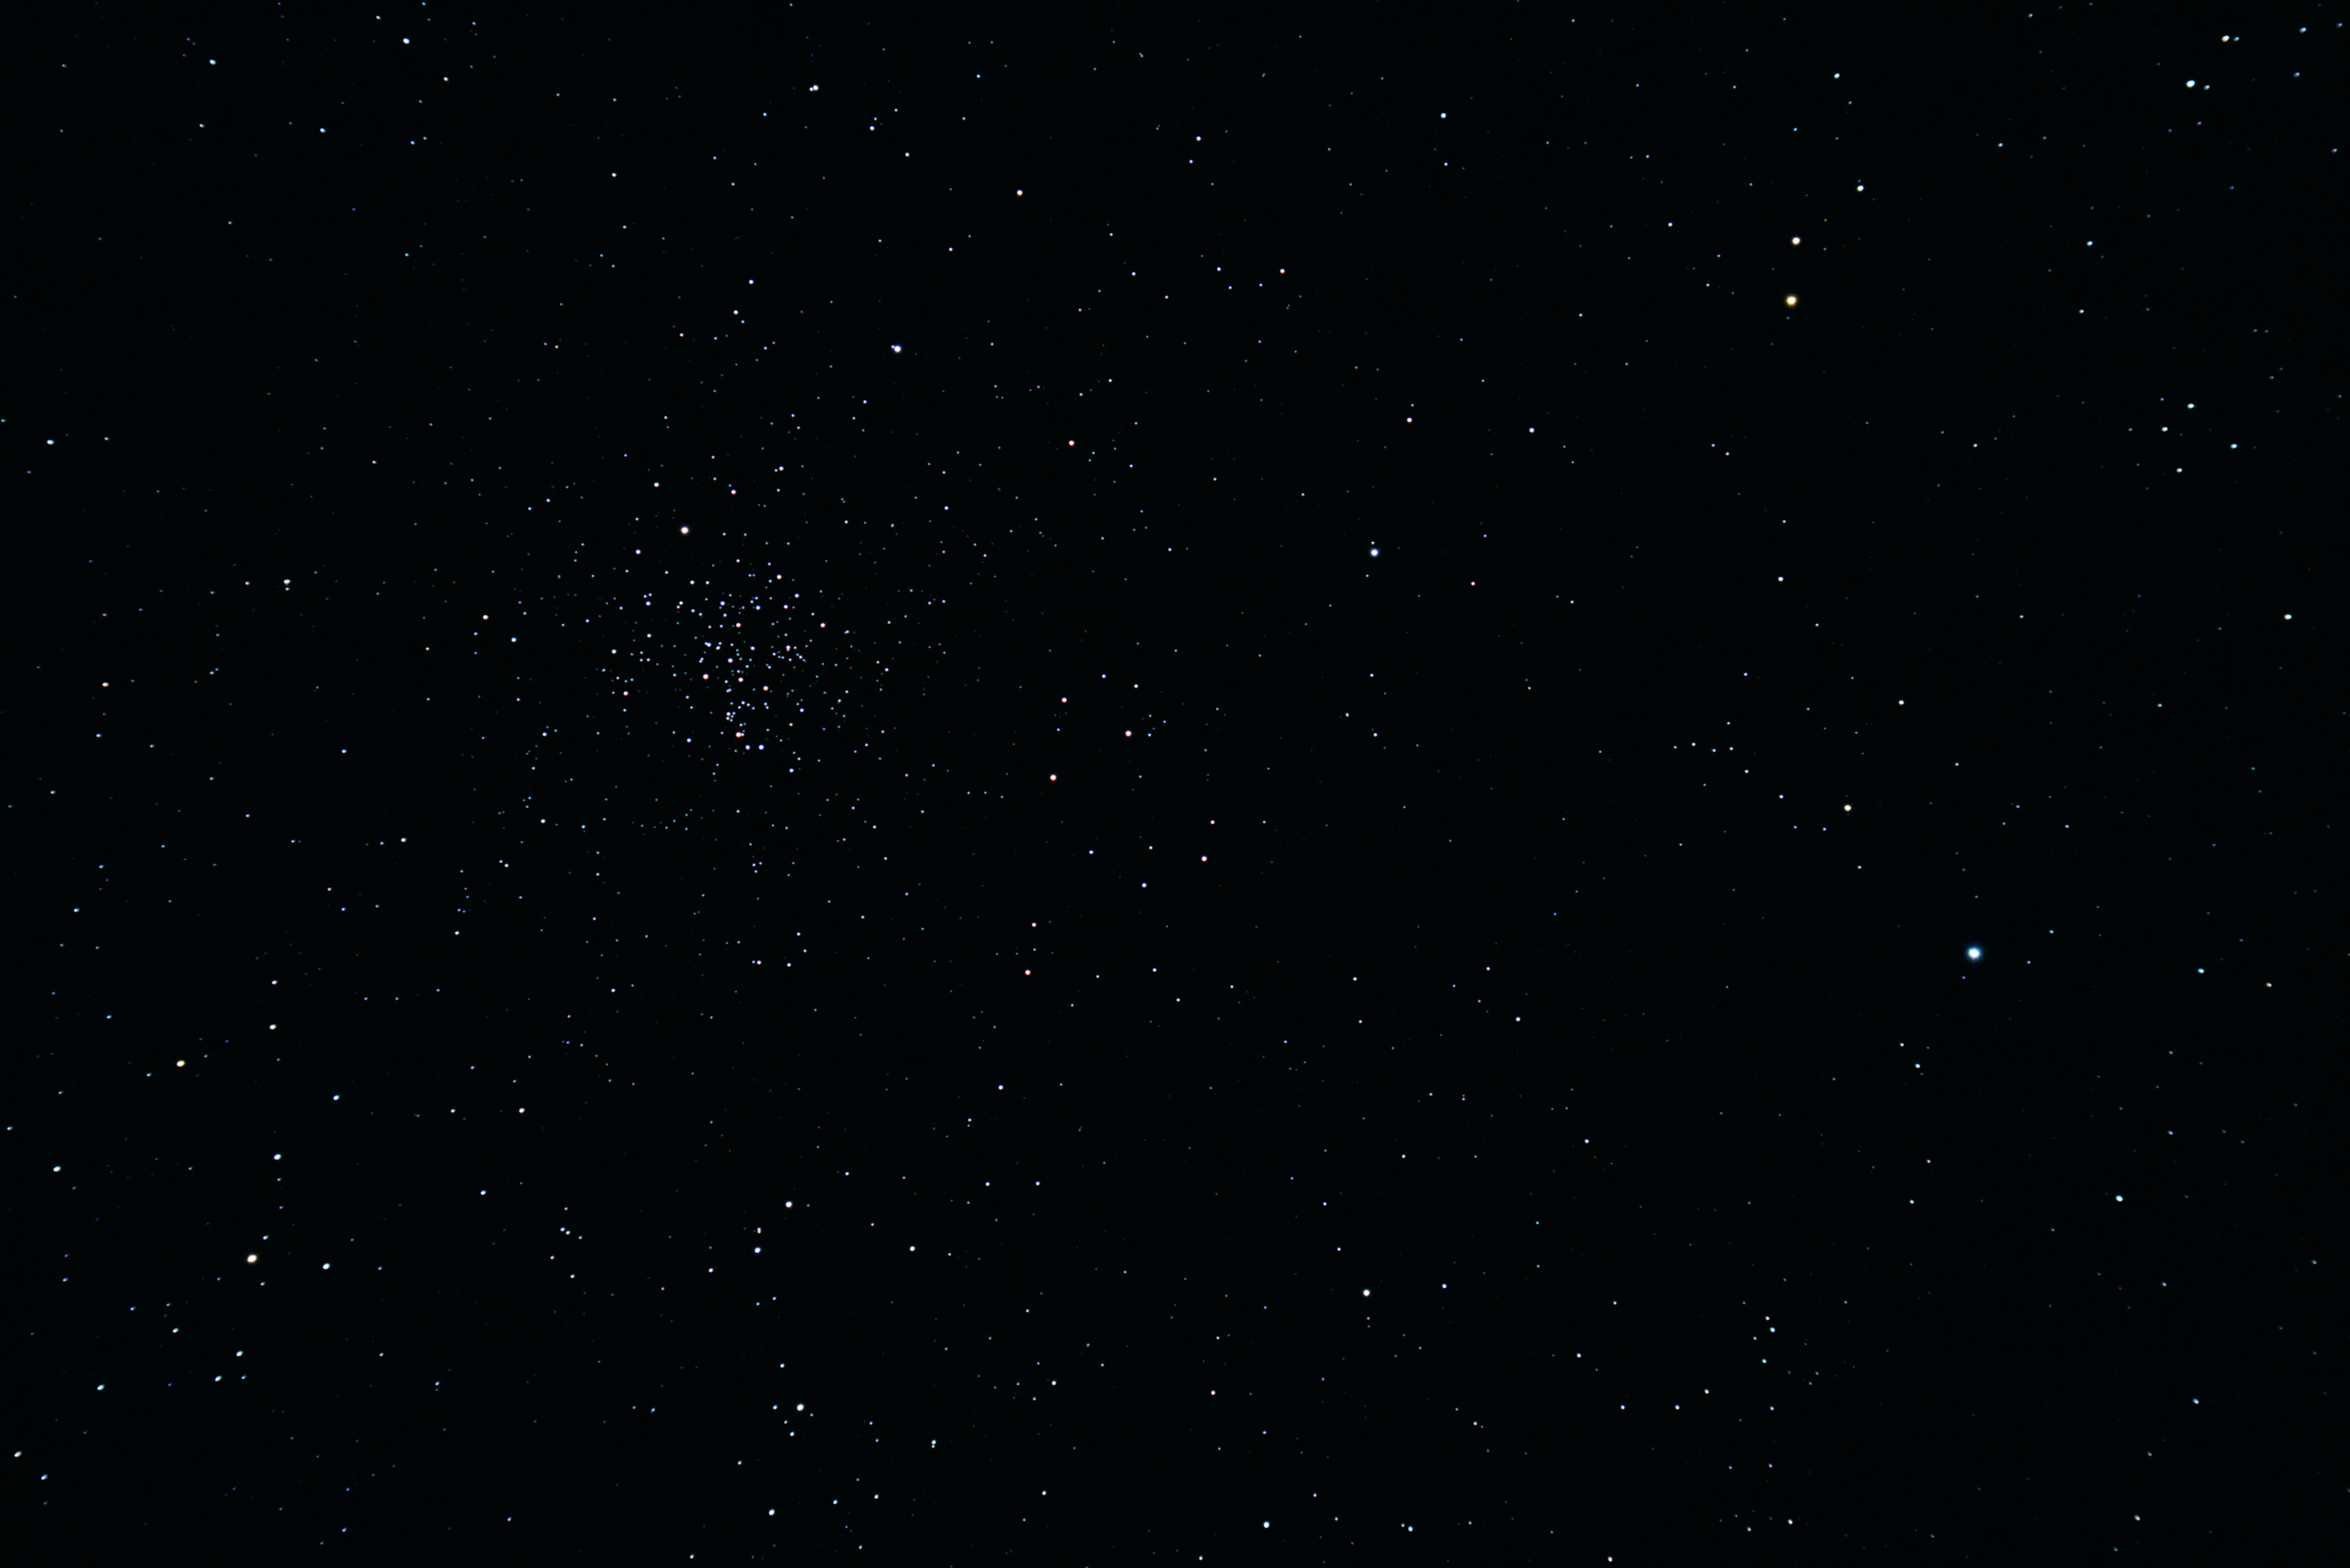
M57 – Ring Nebula

Image

Messier 57, also known as the Ring Nebula is an easy target with all sizes of telescopes, even large binoculars.  Conveniently located almost midway between the bright magnitude 3 stars Beta and Gamma Lyr, it’s very easy to locate.  In the wide field of view photo below, we can clearly see M57’s position with respect to the two bright stars.

Ring Nebula - Messier 57 Planetary Nebula Benoit Guertin

Ring Nebula – Messier 57 Planetary Nebula
Benoit Guertin

M57 is a small target, therefore not ideal for short focal lengths like my Skywatcher 80ED (600mm focal length).  Below is a 1.5x zoom on the nebula itself.  The digital zoom was performed by cropping and scaling the aligned sub images, prior to stacking them.

Ring Nebula - Messier 57 Planetary Nebula Benoit Guertin

Ring Nebula – Messier 57 Planetary Nebula
Benoit Guertin

Telescope: Skywatcher 80ED
Camera: Canon XTi (ISO 800)
Stacking: 21 x 25sec

Full 10Mpix photo