Jupiter and the Great Red Spot

Image

Yay finally got the Great Red Spot!  Throughout the years observing and taking photos Jupiter, I’ve always wondered if the darker detail I was observing was the Great Red Spot.  Based on date and time it’s possible to determine if the GRS is in view, plenty of software and tables out there for that.  But now I’ve captured my first picture of Jupiter where the GSR is unmistakable, 672 million km away.

Jupiter and the Great Red Spot

Jupiter and the Great Red Spot – March 27th, 2016

April is prime Jupiter observing time, as Jupiter reaches the meridian just before midnight.  And we happen to be at time when the Earth-Jupiter distance is at its shortest, so don’t miss out!  As it’s high in the sky, there is less turbulent atmosphere to peer through and the seeing is better.

Jupiter at 10pm mid-April

Jupiter at 10pm mid-April

The chart above is the sky due south at 10pm local time on April 15th.  And if you have a set of binoculars, camera zoom lens or telescope you’ll easily be able to see four of Jupiter’s moons all lined up next to the planet.

Above photo of Jupiter:
Skywatcher 80ED with Televue 3x
Philips Vesta 675 webcam (yes it’s old…)
Registax for alignment and wavelet
Gimp for post-processing

Crab Nebula – Need Bigger Scope

Image

After my series of open star clusters, I decided to try my luck with the neighboring Crab Nebula (Messier 1).  A single 30s exposure show some signal, but barely above the background light pollution.

Very faint M1, just above light pollution levels

Very faint M1, just above light pollution levels

OK, lets see what the wonders of digital stacking and post-processing can do…

After stacking 28 frames, and various histogram and level stretching, I was able to get the nebula to stand out.  That’s quite an improvement from the single frame from above.

Crab Nebula - Messier 1 - Benoit Guertin

Crab Nebula – Messier 1 – Benoit Guertin

I couldn’t get any color out of it, but I believe the color images of the Crab Nebula that you often see are compositions from narrow band filters, and are “scientific colors”.

Conclusions, need to gather more light and image at a longer focal length.  Even if I increase my exposure time, as the object is small I won’t be able to get much detail out of it.  I could add a barlow to double the focal length, but would also need to further increase my exposure time.  If I try this again, I’d need a 2x barlow and at least 2 minutes exposition, and have everything autoguided.  Not there yet… Best reserved for larger and more powerful telescopes.

Skywatcher 80ED
Canon XTi (400D) ISO 800
28 x 30sec (stacked with IRIS and post-processed in GIMP)

Auriga and Its Three Bright Open Clusters

An easy target for anyone is the constellation Auriga and it’s three bright open star clusters.  It may be considered a winter constellation, but there is still plenty of time for some decent observation.  In the early April evenings , Auriga lies west about 45 degrees over the horizon.  It’s brightest star, Capella,  the sixth brightest in the night sky can easily be located.  Therefore these open clusters are easy targets for a quick star-hopping observation for anyone with a small telescope or binoculars.

Auriga in April with three bright open clusters (boxed)

Auriga in April with three bright open clusters (boxed)

My last few posts have been the photos that I’ve captured of these three Messier objects: M36, M37 and M38.  Below is a view if the boxed area from above but with the photos of the open clusters inserted at their correct location.

M37, M36 and M38 (respectively) in Auriga

M37, M36 and M38 (respectively) in Auriga

To see larger images of the open clusters, refer to my following blogs:

Messier 36 – Open Cluster in Auriga
Messier 37 – Brightest Open Cluster in Auriga
Messier 38 and NGC1907 – Open Clusters in Auriga


Messier 37 – Brightest Open Cluster in Auriga

Image

A few weeks ago I spent some time imaging the three bright open clusters in Auriga.  After Messier 36 and 38, I now bring you Messier 37.

Surveys indicated the cluster contains about 1,500 solar masses and about 500 identified stars.  As with M36 and M38 it is located about 4,500 light years from Earth.

Messier 37 - Open Cluster in Auriga

Messier 37 – Open Cluster in Auriga – Benoit Guertin

Large research telescopes often have too narrow field of view to capture open star clusters.  This is where us backyard astronomers with our gear can shine.

Skywatcher 80ED
Canon 400D
33 x 30sec (ISO 800)

Messier 38 and NGC1907 – Open Clusters in Auriga

Image

Following my previous post on Messier 36, a simple 2 degree slew of the telescope and I was centered on Messier 38 (NGC1912).  This open cluster measures 21 light years across ( 21′ apparent) or twice the size of M36.  It is also much older than M36 which is why you’ll find less hot blue stars within the group if you compare with M36.

Just half a degree below is an older and smaller open cluster NGC1907.  While some have speculated that they are locked together (a binary cluster?) this cluster is 500 million years old, almost twice the age of M38, hence were formed at different periods and most likely from different molecular gas.  This is just a chanced fly-by with no interactions.

Open Clusters Messier 38 and NGC1907

Open Clusters Messier 38 and NGC1907

Skywatcher 80ED
Canon Digital Rebel XTi (400D)
30 x 30sec (ISO 800)
Registration with IRIS
Post-Processing with GIMP

Messier 36 – Open Cluster in Auriga

Image

Open Cluster Messier 36 (NGC 1960) is located in the Auriga constellation.  Located about 4,100 light years from Earth, and 14 light years across, it has at least 60 members.  It is very similar to the Pleiades (M45) and if M36 was at the same distance (M45 is 10 times closer) it would be of similar magnitude.  Two other open clusters from Messier’s catalog are located nearby: M37 and M38.  The stars in the cluster are of spectral type B2, and fairly young: 25 million years.

Open Cluster Messier 36. Skywatcher 80ED, Canon 400D 18x30sec

Open Cluster Messier 36. Skywatcher 80ED, Canon 400D 18x30sec

The blue-ish stars contrast with the older yellow and orange stars in the background.  This can be further enhanced by using the SBLUR function in IRIS to selectively blur and enhance the colors of bright stars.  While the colors are exaggerated in the image below, it is nevertheless interesting to see the vast diversity of stars and their color.

Open Cluster Messier 36. Skywatcher 80ED, Canon 400D 18x30sec

Open Cluster Messier 36. Skywatcher 80ED, Canon 400D 18x30sec (SBLUR for colour)

Telescope: Skywatcher 80ED
Camera: Canon Digital Rebel XTi (400D)
Exposure: 18 x 30sec (ISO 800)
Date: 18Mar2016

Composition with Landscape

I’ve mentioned it before that you don’t need a fancy telescope and tracking equatorial mount to get into astrophotography.  Simply a camera on a tripod with a short focal lens can do wonders, especially with the high ISO settings in new cameras. A single 10 seconds exposition can reveal lots of stars, however to capture more photons a longer exposure is not better as the stars will become streaks.  But one can easily improve the image and get better signal/noise ratio by stacking multiple images.

However, there is one drawback to stacking multiple exposures if you decide to also capture the landscape: Earth rotates, therefore the sky moves while the landscape stays still.  If you align the images using the stars, then the landscape becomes a blur.  Not the end result that we want.  Luckily a quick composition with two layers and a mask solves everything.

Below is a single 10 seconds exposure at ISO 800 with a 17mm F4 lens; you have the landscape with city lights and the stars above.  Yes that is Orion…

Single 10sec exposure (ISO 800)

Single 10sec exposure (ISO 800)

In order to improve my signal, I worked with IRIS to align and stack 5 frames, this reveals many more stars, but also amplified the light pollution.

Aligning and stacking 5 images. More stars appear.

Aligning and stacking 5 images. More stars appear.

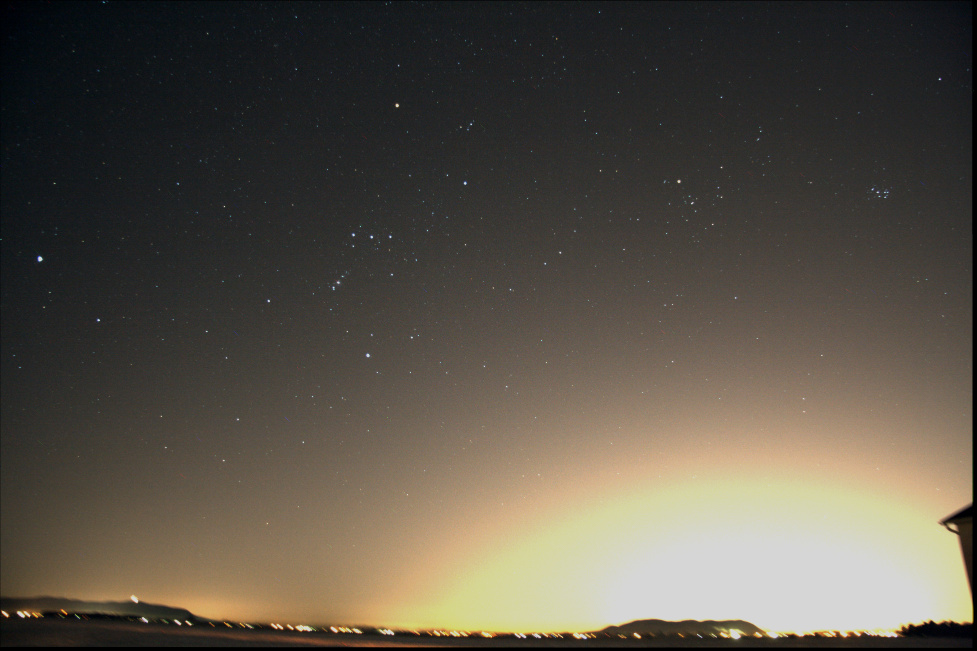
Luckily within IRIS there is a function to remove sky gradient.  The algorithm takes a series of sample points and attempts to make the sky uniform.  Not bad, the images are not a hopeless case.

Removing the sky gradient with IRIS

Removing the sky gradient with IRIS

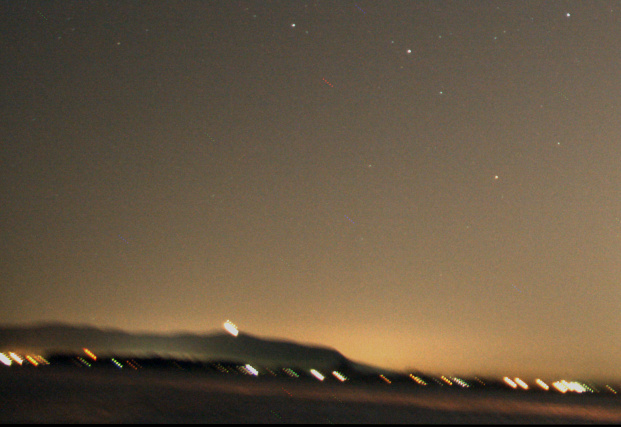
As mentioned above, the alignment was performed with the stars, hence the background is now blurring.  Below is a close-up.

But when aligning on stars, the landscape blurs.

But when aligning on stars, the landscape blurs.

That is just 5 images, stack a much larger quantity or with more time between frames and it will only get worse.  It becomes pointless to shoot with the landscape if the end result is blurry.  Luckily working with layers in a photo editor can easily solve the issue.  We want to keep the stars from the stacked image, but the landscape from a single frame.  Follow these easy steps:

  1. Load into your base layer one of you single frames.  This is what will be used for the landscape.
  2. Load into a new layer your stacked image.  As your stacked image contains more and brighter stars select to Lighten Only instead of normally adding both layers.  You can play with the brightness of the stacked layer, and/or darken the base layer to get the desired blending.
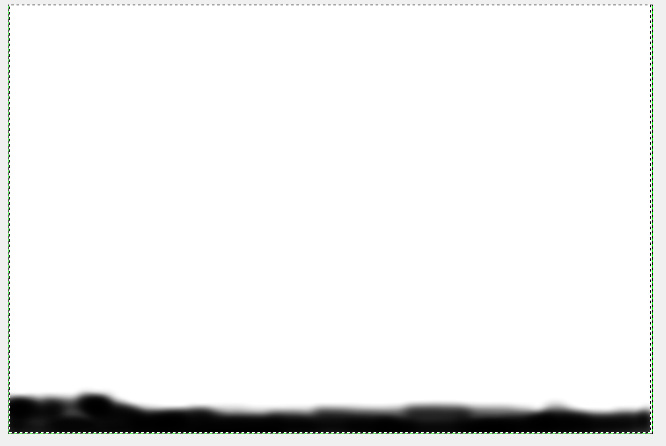
  3. Create a mask to the stacked layer such that the blurred landscape is not permitted to show through.  See image below, I simply grabbed the airbrush and blackened the landscape area in the mask such that it will not show through the layer.  Note that the I only edited the mask, not the image itself.
Creating a mask for my layer: white is transparent, black will block

Creating a mask for my layer: white is transparent, black will block

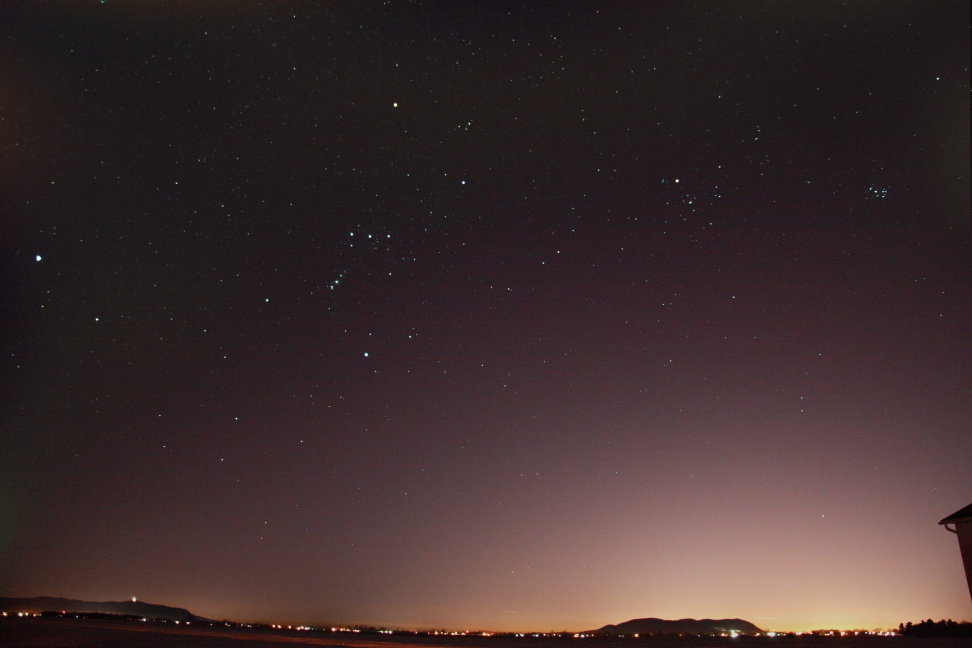
The end result, is improved image of the sky, and a landscape that is still sharp.

Both layers added with the mask

Both layers added with the mask

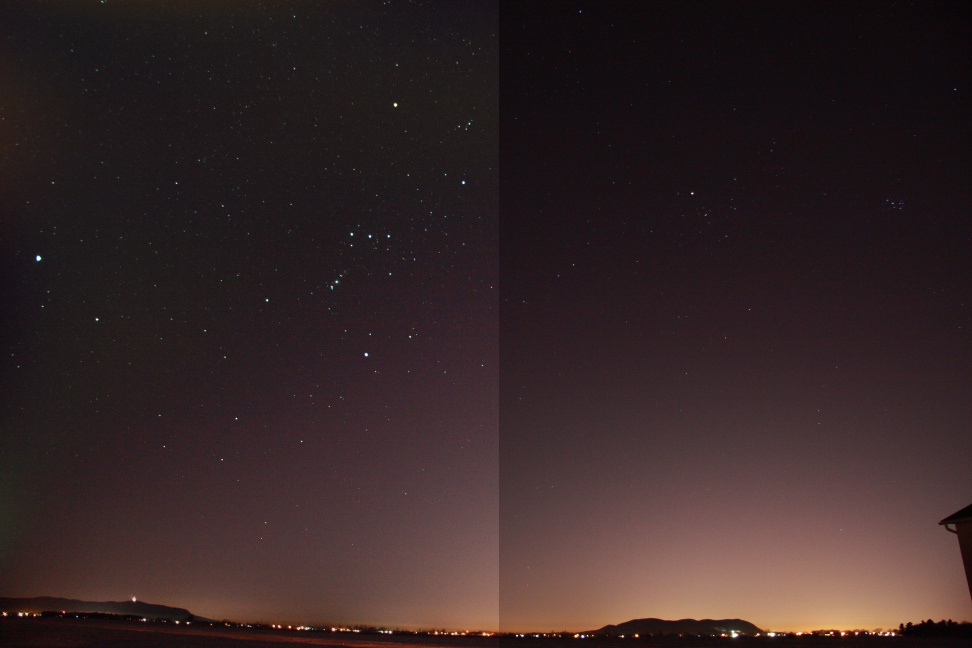
Below is a comparison the composition with stack and layer (left) and a single shot (right).  We are able to achieve both of our goals of getting more stars (more signal) while keeping the landscape from becoming a blur.

Comparing the composition with layers (left) and single shot (right)

Comparing the composition with layers (left) and single shot (right)

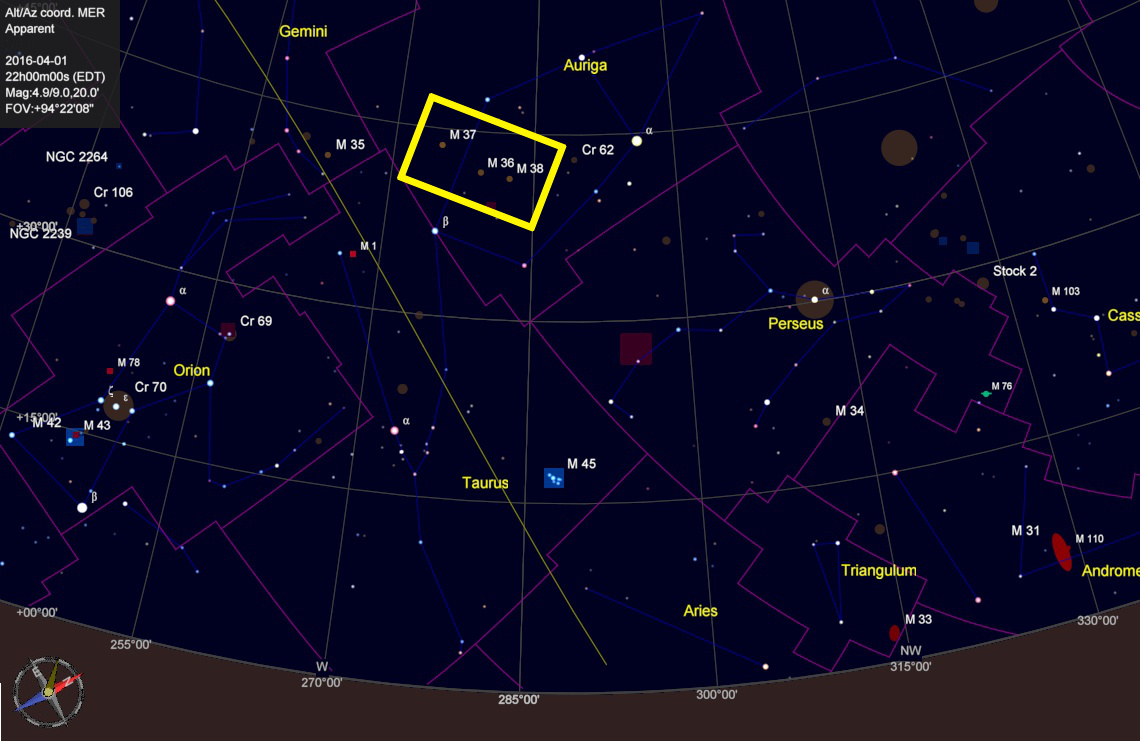
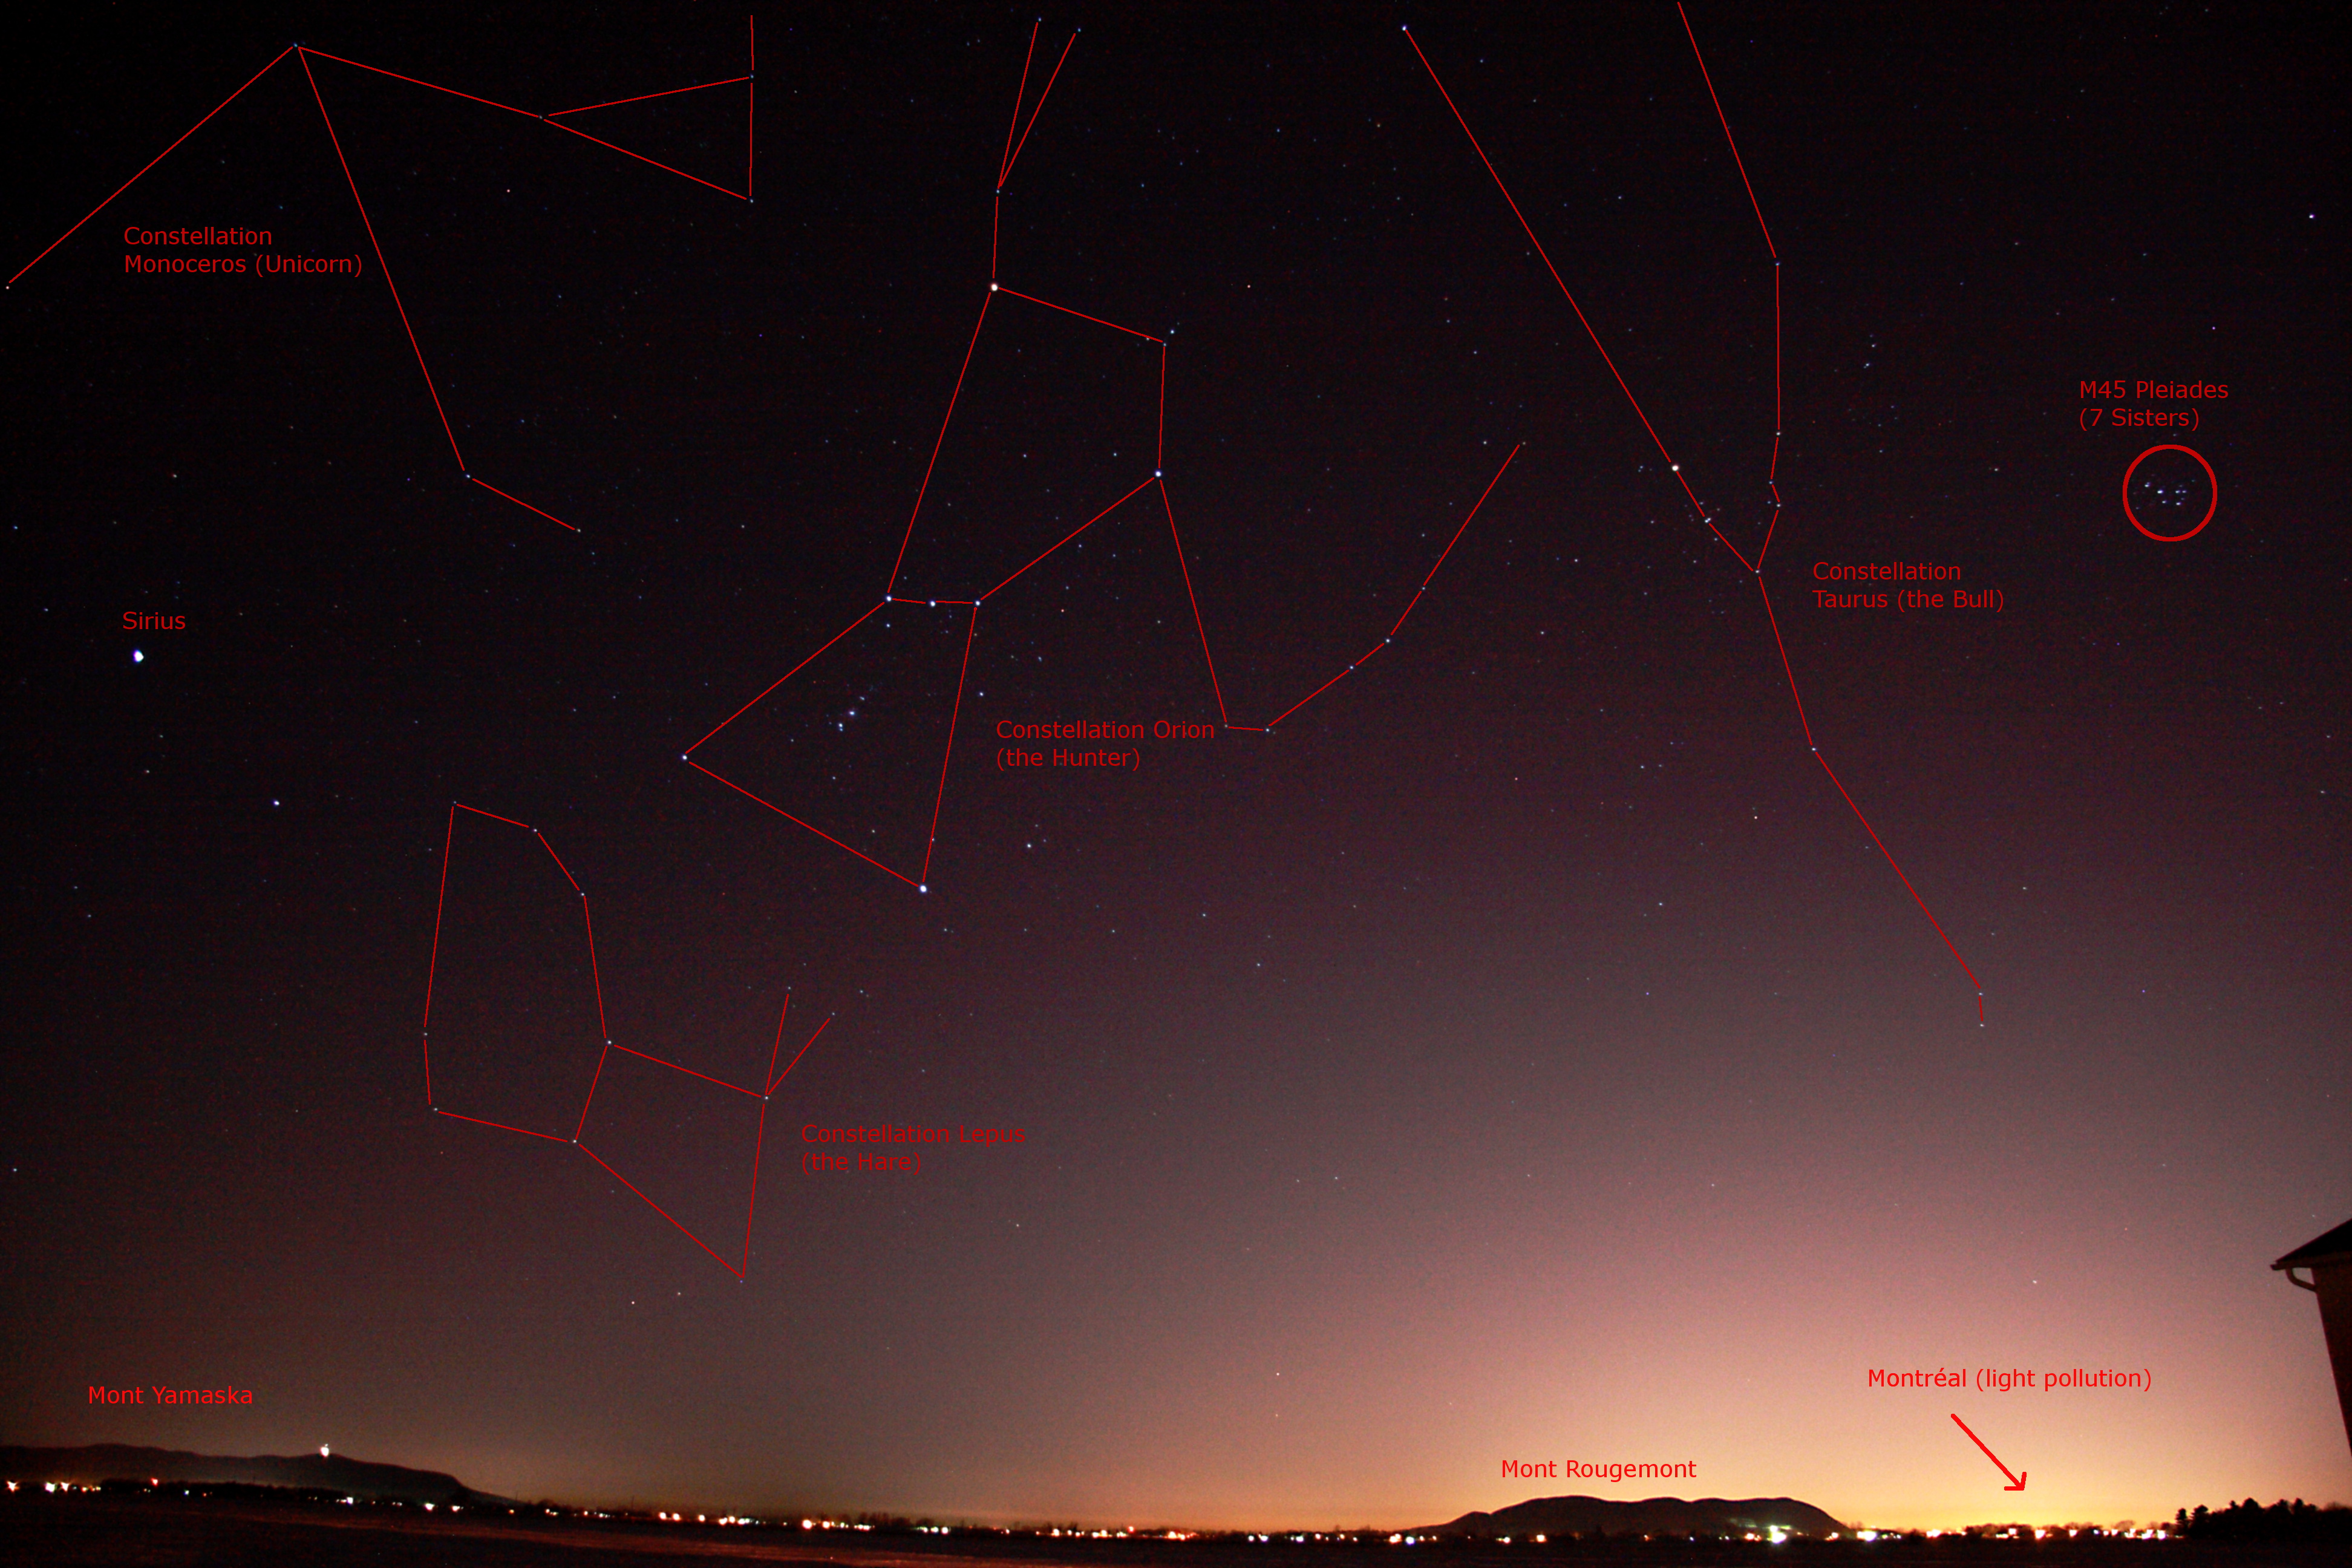
And why not take some time to identify some key features in the image.

Constellations Orion and Taurus above the landscape.

Constellations Orion and Taurus above the landscape. (Click to open)

Changes in Lunar Size

Image

While doing some organization in my astrophotos I came across a picture composition that I created back in September 2015 following the Super Moon Lunar Eclipse, but which I never posted.

I had selected two Lunar Eclipse photos that I had taken with the exact same equipment, but on different year and wanted to see the difference in size with this “Super Moon”.  Was it really that much bigger…

Lunar Size Comparison Between February 2008 and September 2015 Lunar Eclipse

Lunar Size Comparison Between February 2008 and September 2015 Lunar Eclipse
– Benoit Guertin

The Moon’s orbit is elliptical and eccentric which causes the Moon’s distance to vary by 50,200km from perigee (closest) to apogee (furthest).  The end result is a 12% change in apparent diameter as viewed from Earth.  The above image only shows a 7% difference as while the background Moon was taken at perigee (famed Super Moon) the foreground was an arbitrary reference of the February 2008 lunar eclipse.

Telescope: Skywatcher 80ED (600mm)

Tripod and a Camera? Make a TimeLapse

Video

You don’t need a telescope to enjoy astro-photography.  All it takes is a camera, a tripod and a timer remote controller to take interval images without you having to be there.  I know that most of the image taking is done with the camera connected to a computer.  But this remote controller allows for control of the shutter in the BULB setting without a laptop.  See it as a “grab-n-go”, travel-light type of accessory to the camera.

Canon_tc_80n3_remote_control

Set it up to take a large sequence of shots and you got the makings of a timelapse video.  Because there is no tracking with the tripod, keep the exposures under 10 seconds.  Then use video editing software like Microsoft Movie Maker to covert all those images into a video (see my article here).

It’s always interesting to analyse your frames to determine what you’ve capture, to identify key or important elements.

Wide field of the sky, mountains and horizon from a Montreal south sore suburb. March 4th, 2016. Benoit Guertin

Wide field of the sky, mountains and horizon from a Montreal south sore suburb.
March 4th, 2016. Benoit Guertin

Unfortunately, my camera battery wasn’t fully charged, and the cold drained it quickly, therefore only got about 100 frames in.

Christmas 2015 Full Moon

Image

After sneaking the kids’ gifts under the tree while they were sound asleep, I decided to see if the Christmas 2015 Full Moon was visible.

A thin cloud lightly obscured the view, and I wasn`t sure if the early morning sky would yield any better weather.  A few quick shots at 17 and 85mm on the Canon EFS lens to record the event as the next Christmas full Moon will be in roughly 30 years.