With Earth having passed between Jupiter and the Sun on March 8th, we have some of the finest observations of the Jovian planet. It’s only normal to have a few backyard astronomers setting their sights on the largest planet (myself included, still got unprocessed videos from March 27th). However Gerrit Kernbauer was lucky enough to record an unusual event: something slammed into Jupiter!
Phil Plait of Bad Astronomyreported that Gerrit Kernbauer with his 20cm telescope in Austria, captured on March 17th what appeared to be an impact of sort.
The issue was to confirm that it was an actual impact, and not some other natural effect or electronic noise in his setup. What better than to have a second independent observation, and that came from John McKeon with a 28cm telescope in Ireland.
Maybe I should go take a look at my videos on Jupiter from March 27th just in case… Actually with my 80mm telescope, I don’t think it would have picked up such an impact.
Tonight, June 30th, right after sunset and before it’s fully dark if you look West you’ll see Venus and Jupiter less than a degree apart in the sky. And with either binoculars or a small telescope you’ll be able to observe Venus as a crescent, and the moons of Jupiter.
Planetary imaging is usually where everyone starts. The targets are bright objects in the sky such as the Moon and the planets that don’t require long exposures; Venus, Mars, Jupiter and Saturn. And because there are no long exposures, no need for a mount that tracks. The electronics of a webcam allows between 5 and 60 frames per second (fps), more than enough to get a good image that can be used with any sized telescope, and the result is a AVI movie that can be easily processed.
There are two ways to use the webcam:
Prime focus: the original webcam lens is removed and the telescope becomes the lens; like swapping lens on a SLR camera. Magnification is provided by the focal length of the telescope and the optional use of a barlow lens.
Eyepiece projection: the webcam replaces the eye and the magnification is provided by the ratio of telescope focal length to eyepiece focal length.
In my case I went with a prime focus solution, hence I needed a webcam where the original lens could be removed and replaced with an 1.25″ adapter to fit into the telescope’s focuser.
Philips Vesta Pro 680K webcam modified for use on telescope
The camera sensor, be it CMOS or CCD is sensitive to a wider spectrum than the human eye, therefore most have build-in UV and IR filter, either on the lens or the sensor. As this filter was on the original webcam lens I purchased a BAADER UV-IR Rejection 1.25″ #2459207 filter for use with the adapter. Refractors have a challenge getting all colours focused at the same spot, and even with an APO scope what falls in the UV and IR range will generally appear out of focus. Best to keep those out with a filter.
Today a good planetary imager can be purchased for under $200, but when I started, most astronomy imaging devices ran in the $1000+ camp. The Philips Vesta 680K was rather popular as a wonderful man by the name of Steve Chambers figured out how to easily modify the webcam electronic to get much longer exposures. The Vesta was also equipped with a CCD-based sensor, more sensitive than the CMOS technology used in most webcam. These modified webcam became to be known as Vesta-SC.
I’ve spotted Jupiter, can I take a photo? Actually you should take a video. The reason is that there is a great deal of turbulence in the atmosphere and this causes the image to blur and giggle about. By taking a video you are doing two things:
Capturing a large quantity of images which can be later processed
May happen upon a brief period of atmospheric stability
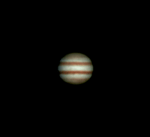
Here is a 30 second segment of Jupiter with my setup
I recommend taking a few videos with different settings such that you’ll be able to see after which provided the best results. Select an uncompressed format such as AVI as to not get compression artifacts, and AVIs are easily broken into individual image frames.
Software such as IRIS or REGISTAX can be used to process the video. REGISTAX is actually quite good and painless at doing this. Don’t be intimidated by the large number of settings and parameters, you can get great results out-of-the-box with the default settings.
The process breaks down into 5 steps:
Select your target (what you want the software to track on)
Filter on the frames that have good image quality; only keeping those that are sharp and resemble each other
Align (register) the individual images
Stack the individual images
Wavelet analysis and final brightness/colour balance
Because of the high number of images, you can actually improve image resolution by up-sampling or drizzling the image prior to stacking. The end result is often an image that can be scaled up by 2x while maintaining resolution.
Wavelet analysis is a type of sharpening, similar to unsharp-mask, but treating each level of granularity as a different “frequency”. While unsharp-mask is tuned to a specific size of detail, wavelet is able to treat various levels of details as different layers of the image and add the results.
Jupiter is a good target right now as it’s high in the sky, so you’re not looking through too much atmosphere and turbulence. Now this is far from my all-time best shot, but after a 3 year break, I’m a … Continue reading →
One of the great targets for backyard astronomers is Jupiter, and spotting its moons, the cloud bands and the Great Red Spot is always a treat. Observations over a few days provides a good view into the dynamic nature of the clouds and the orbits of the Moon. I haven’t yet managed to capture the Great Red Spot on photo, but maybe this fall as Jupiter comes back into view in the evening sky, I should make the effort to spot the GRS. This is because ever since it’s discovery in the 1800s, it has been shrinking in size. And at the current rate, it could be gone all together in as little as 20 years!
Jupiter’s Great Red Spot (1995 and 2014) – NASA
In the last 10 years it has shrunk by 3000km, taken a more circular form and increased its rotational speed. Amateur observations since 2012 have revealed that this phenomenon is even accelerating, shrinking by as much as 930km per year. Current measurements have the GSR now pegged at under 15,000km in diameter.
As we head into the fall, Jupiter will become easier to observe. By December Jupiter will be high in the sky around midnight. On February 6th, Jupiter will be at Opposition, fully illuminated by the Sun and at its closest to the Earth.
The photo in the title bar was taken by me back in September 17th, 2010, only 4 days before its closest approach, which shows that even with a small 80mm scope, quite a bit of detail can be captured when the conditions are right.
Welcome to a journey into our Universe with Dr Dave, amateur astronomer and astrophotographer for over 40 years. Astro-imaging, image processing, space science, solar astronomy and public outreach are some of the stops in this journey!